Model Context Protocol (MCP) finally gives AI models a way to access the business data needed to make them really useful at work. CData MCP Servers have the depth and performance to make sure AI has access to all of the answers.
Try them now for free →Obfuscate Live Salesforce PII Data in Power BI using CData Connect Cloud
Protecting sensitive information is critical when working with Personal Identifiable Information (PII) data for data visualization and analytics. Power BI, renowned for its capability to transform raw data into actionable insights, offers a platform for organizations to derive value from their data. However, when dealing with sensitive PII data within Salesforce, ensuring data privacy and compliance becomes imperative.
With CData Connect Cloud's Virtual Datasets paired with Derived Views, the users can add a layer of governance to further abstract and curate the data made available for individual users.
In this article, we explore the process of leveraging Virtual Datasets and Derived Views in CData Connect Cloud to obfuscate live Salesforce PII data within Power BI. By following the steps outlined herein, organizations can harness the full potential of Power BI while safeguarding the privacy and integrity of their Salesforce data.
NOTE: While this article shows obfuscating Salesforce data, the principles can be applied to any of the 150+ data sources.
Configure Salesforce Connectivity
To work with Salesforce data, we start by creating and configuring a Salesforce connection in CData Connect Cloud.
- Log into CData Connect Cloud.
- Navigate to Sources, and click Add Connection.
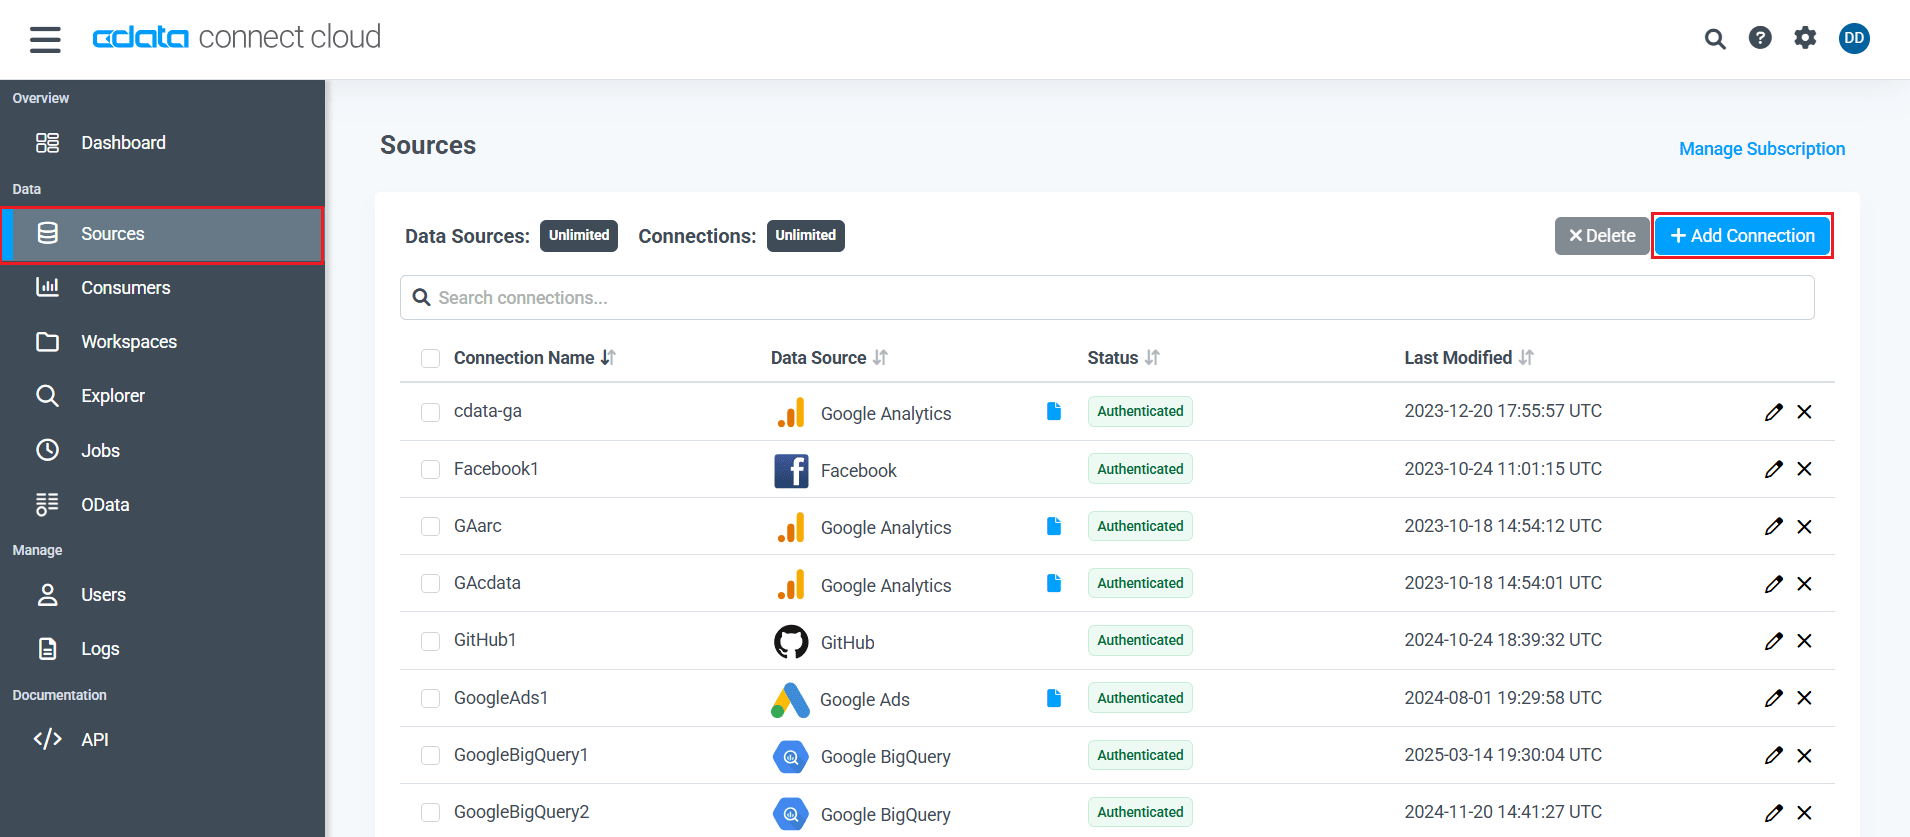
- Select Salesforce from the Add Connection panel.

- Enter the necessary authentication properties to connect to Salesforce. There are several authentication methods available for connecting to Salesforce: Basic, OAuth, and SSO.
- Basic: The Basic method requires you to have the username, password, and security token of the user.
- OAuth: If you do not have access to the username and password or do not wish to require them, you can use OAuth authentication.
- SSO: SSO (single sign-on) can be used by setting the SSOProperties, SSOLoginUrl, and TokenUrl connection properties, which allow you to authenticate to an identity provider.
- Click Connect to check the connection. Once succesfully connected, click Save & Test.
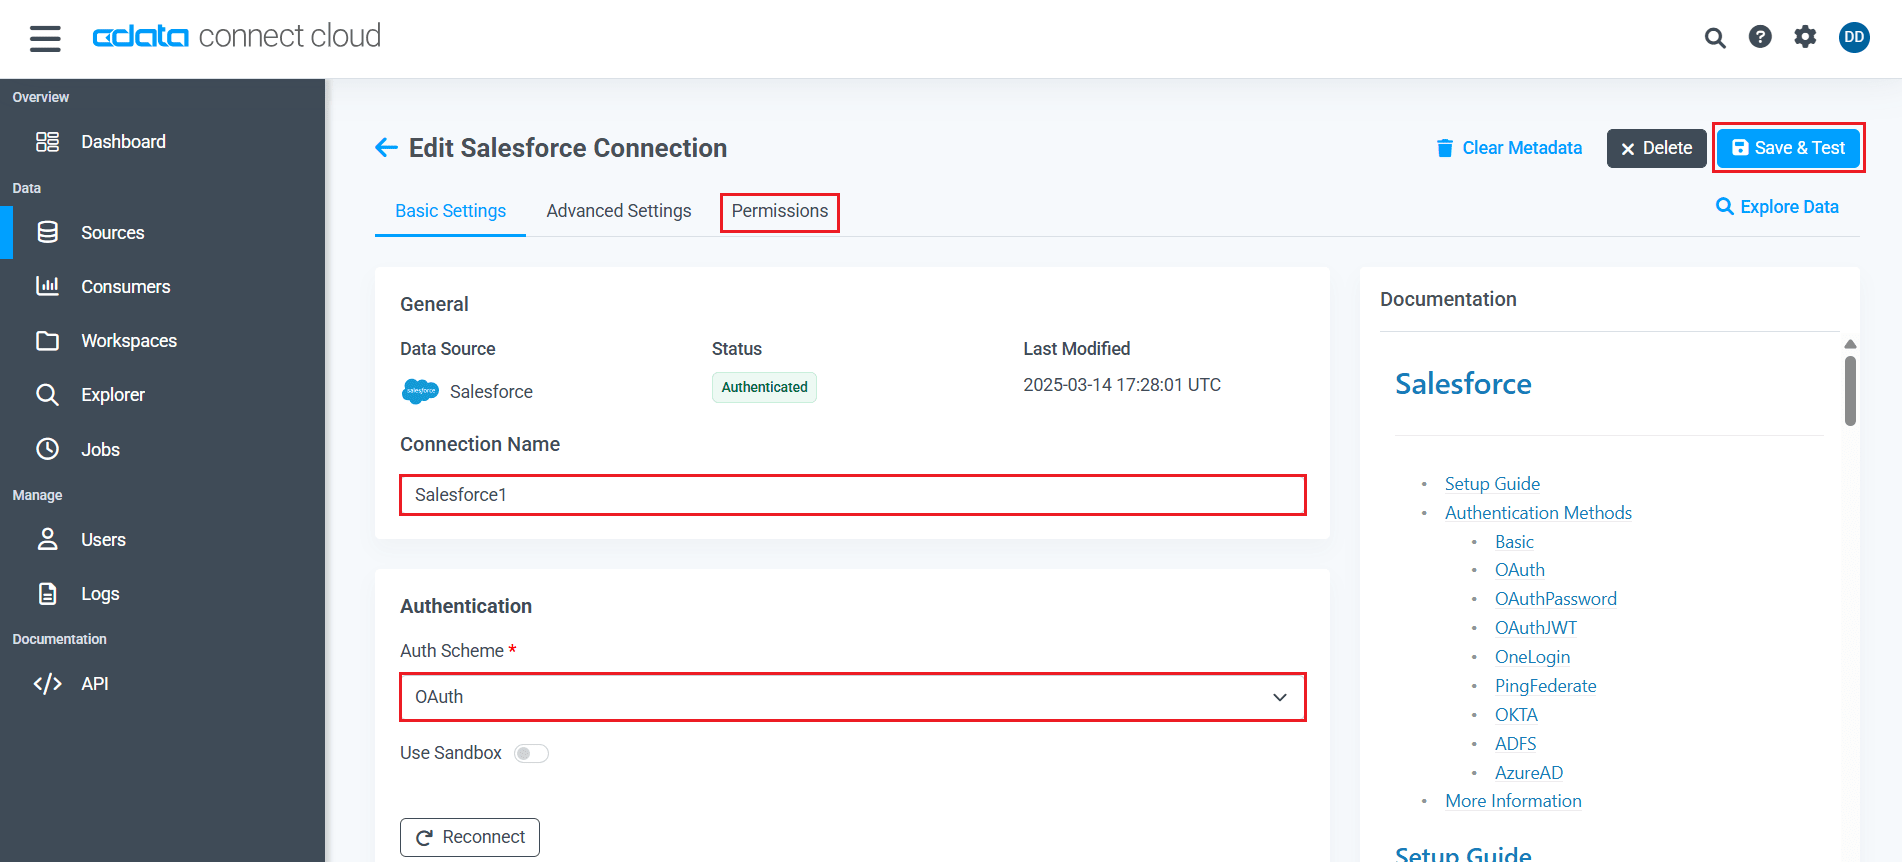
- Navigate to the Permissions tab in the Edit Salesforce Connection page and update the User-based permissions
See the Setup Guide in the help documentation for more information.
Create a Derived View using Data Explorer
Follow the given steps to create a Derived View (custom view) using the Salesforce data and modify your view to obfuscate your PII information.
- Navigate to Explorer and select the Salesforce connection.
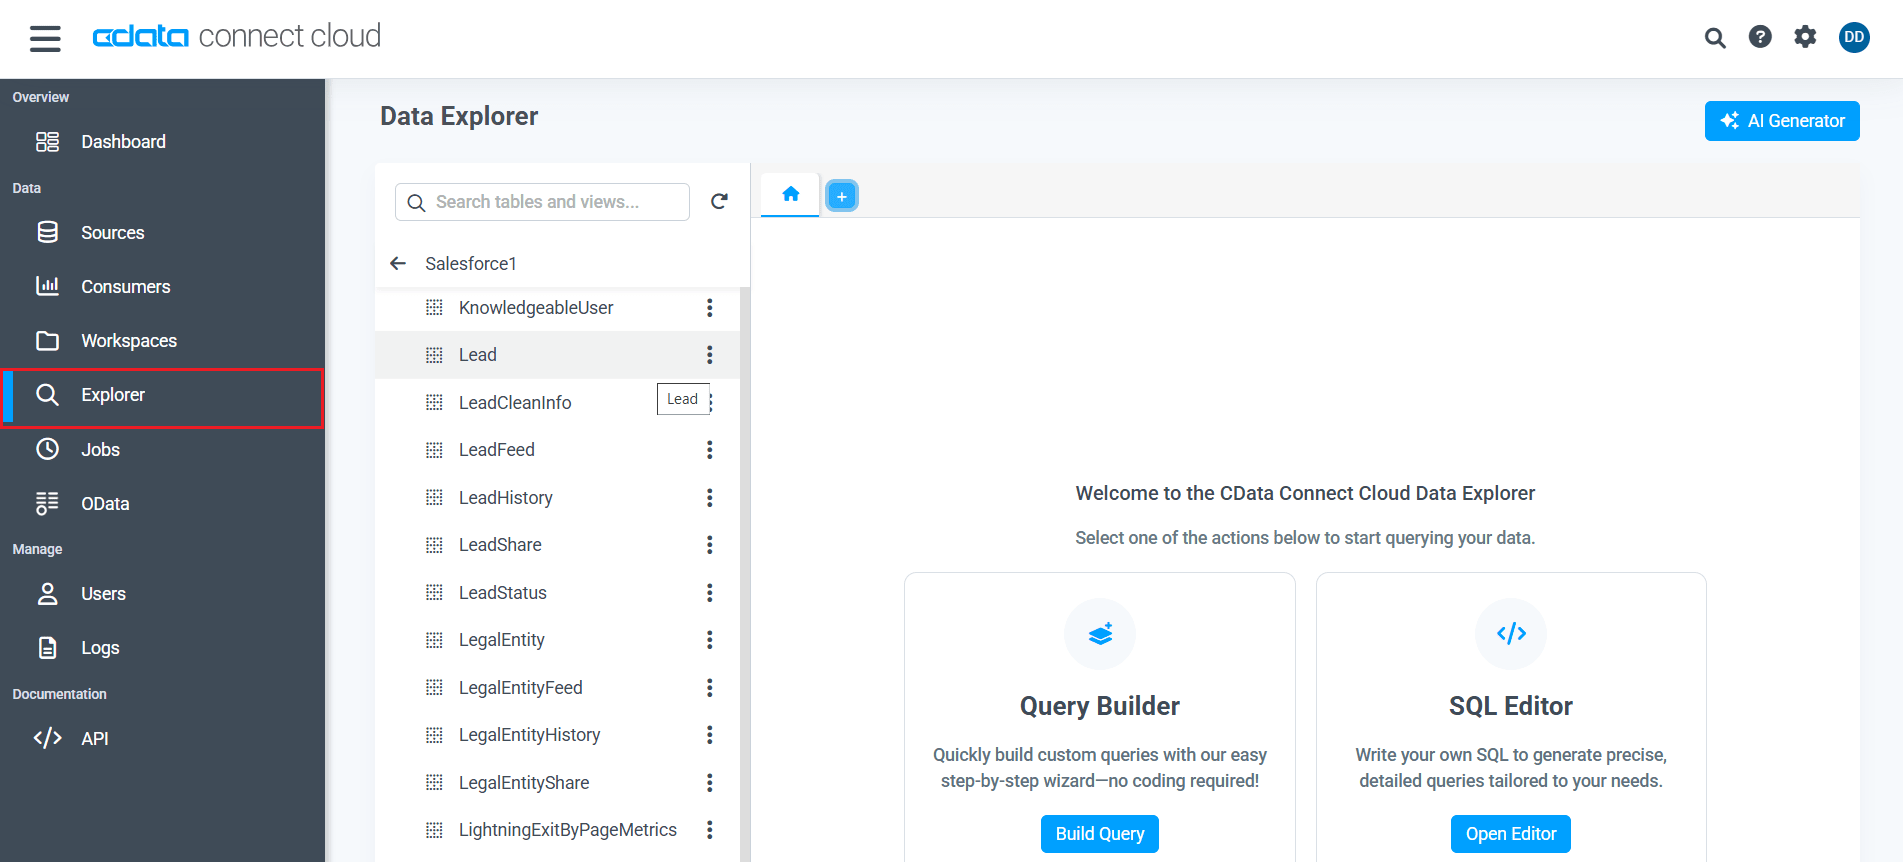
- Search for the table or view that you want to build reports on.
- Select the table and click Query.
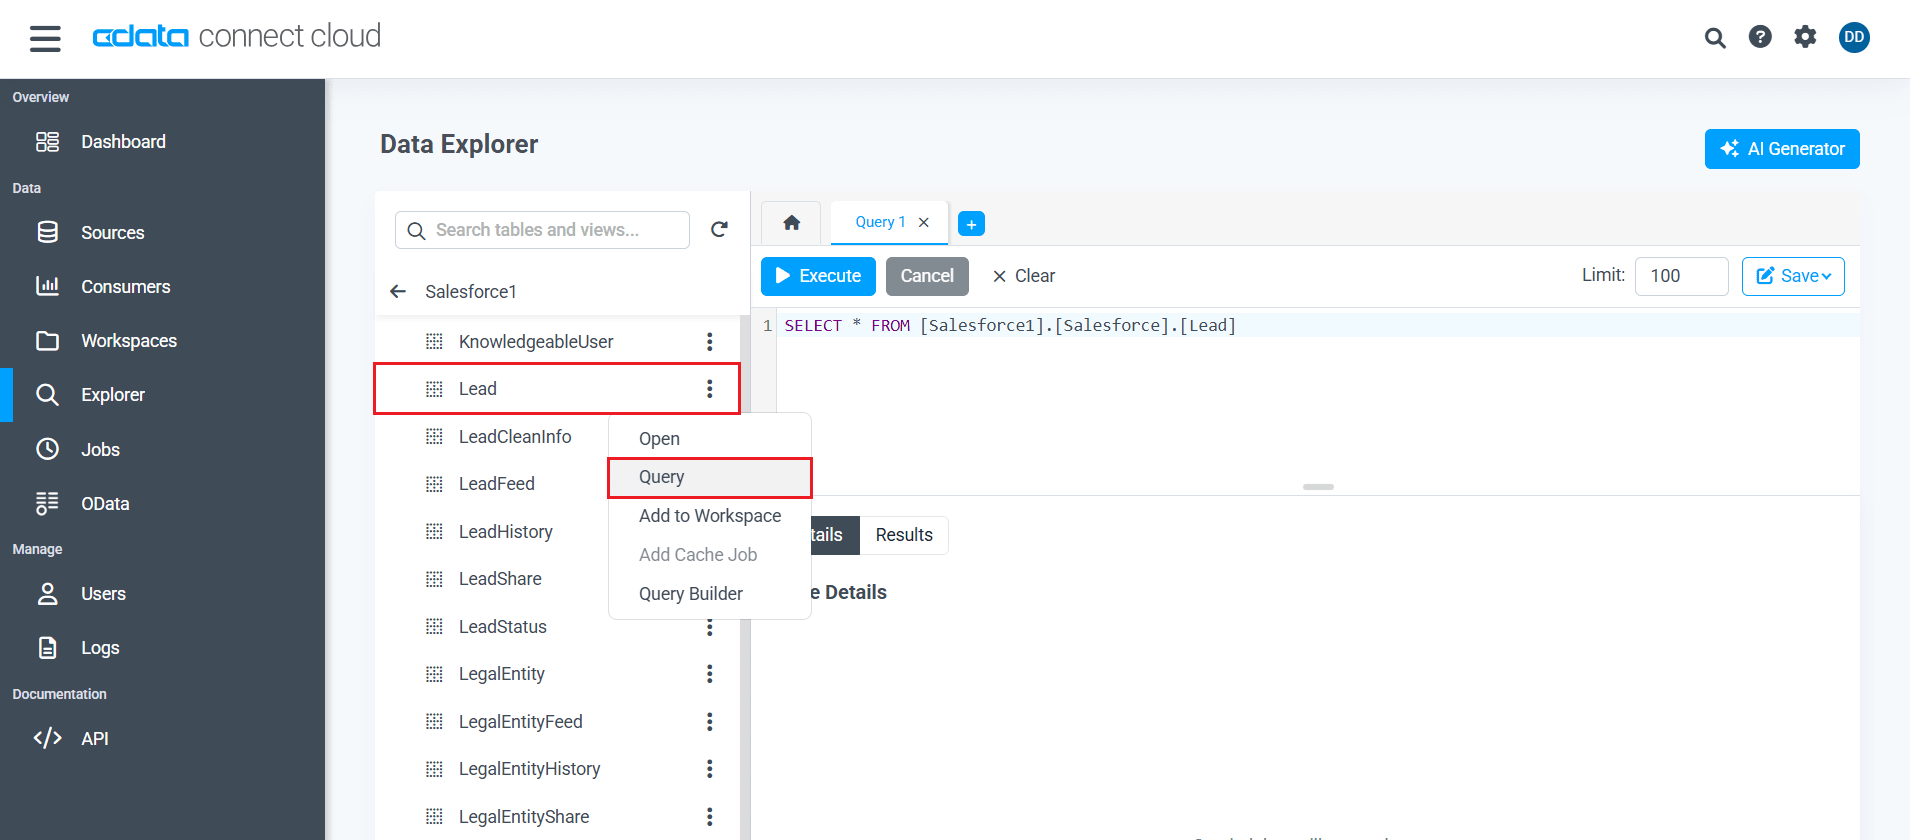
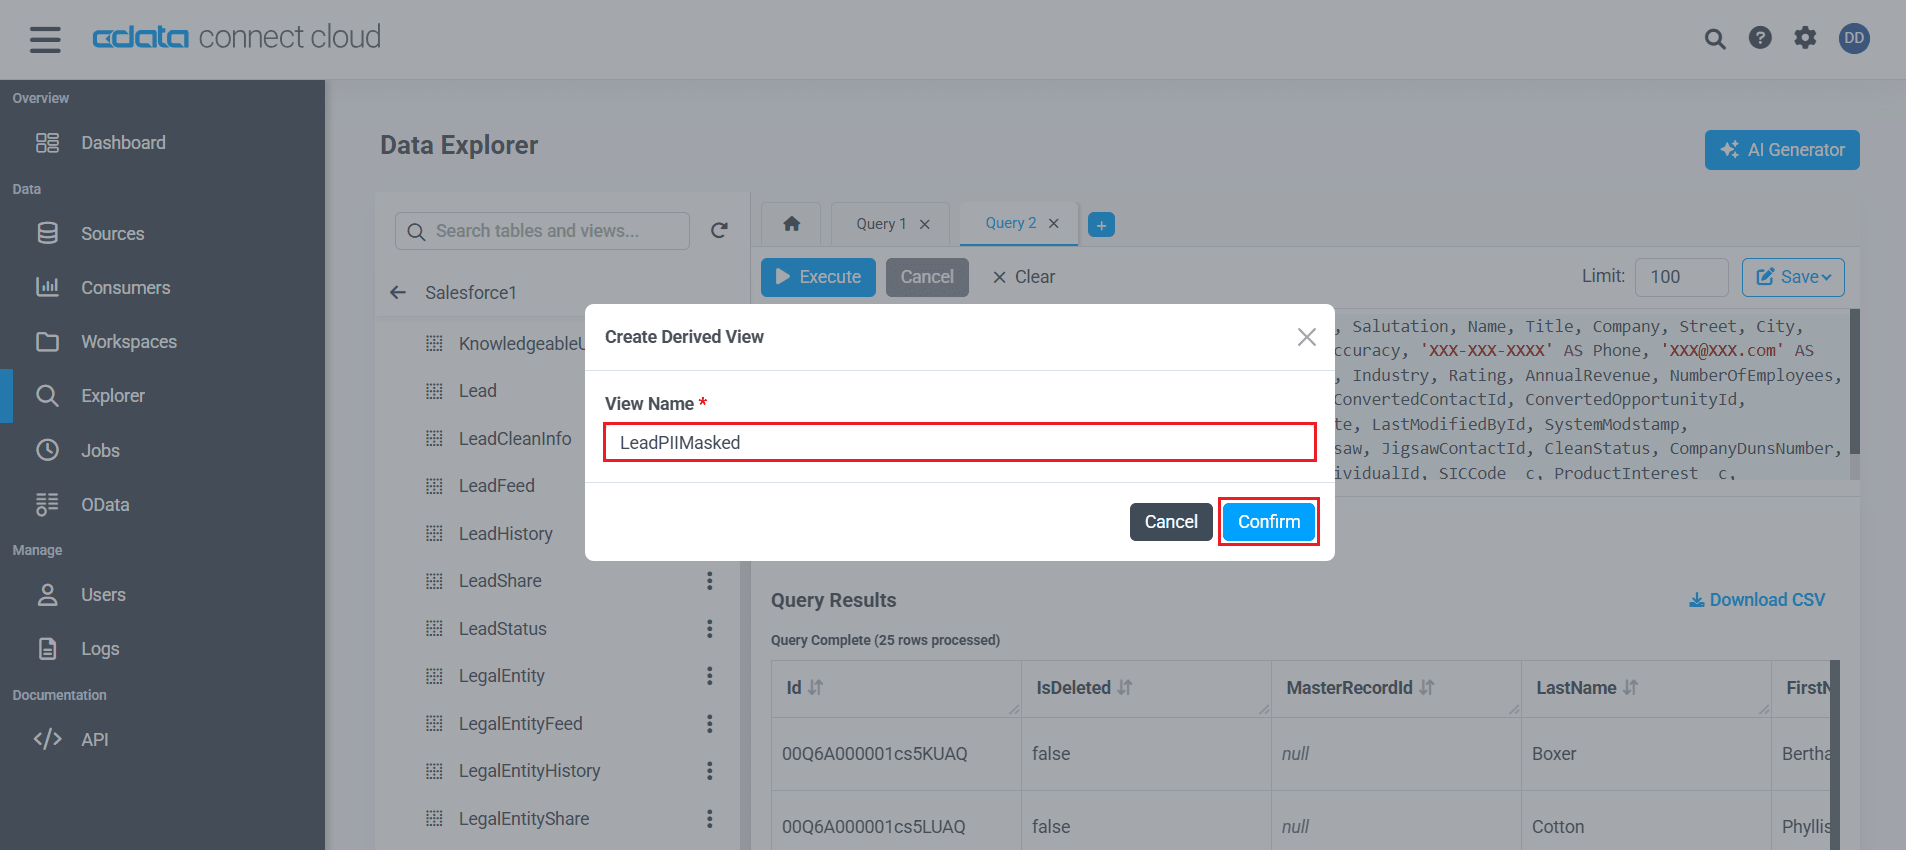
- Modify your SQL query to mask the PII data manually or use our AI Generator to write the query for you.
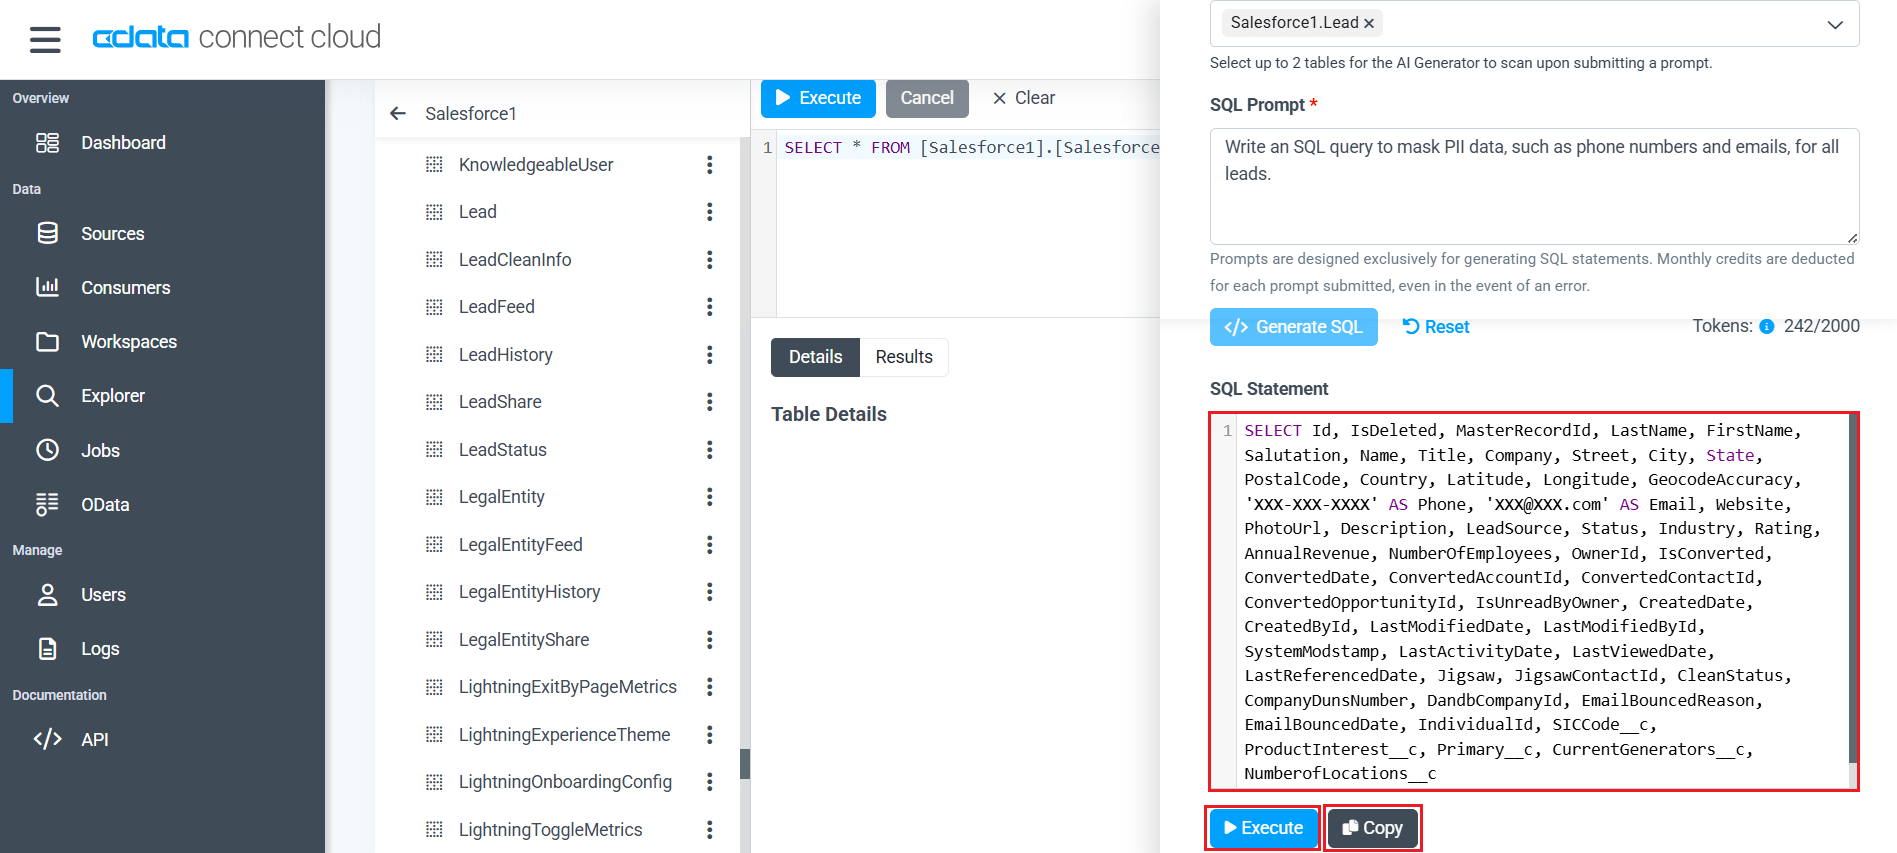
- If you choose the AI Generator, ensure that you add the Salesforce connection from the Connections dropdown and select the desired table from the Tables dropdown. Once you add a prompt, click Generate SQL to generate a SQL query.
Prompt example for the AI Generator: "Write an SQL query to mask PII data, such as phone numbers and emails, for all leads."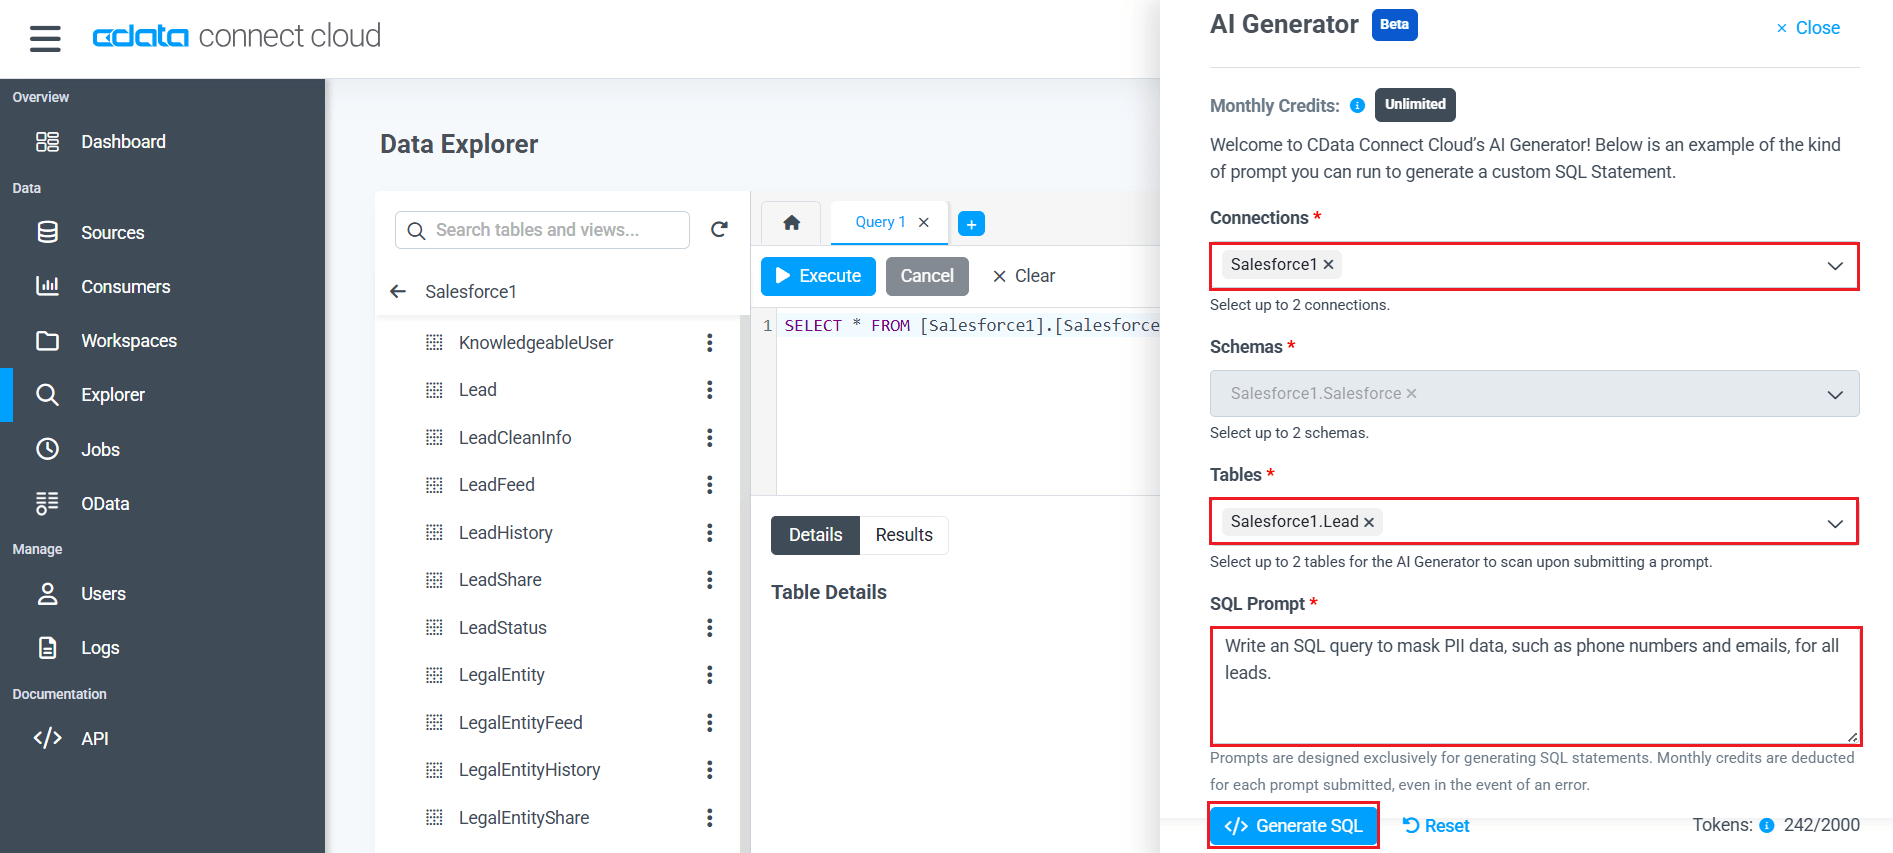
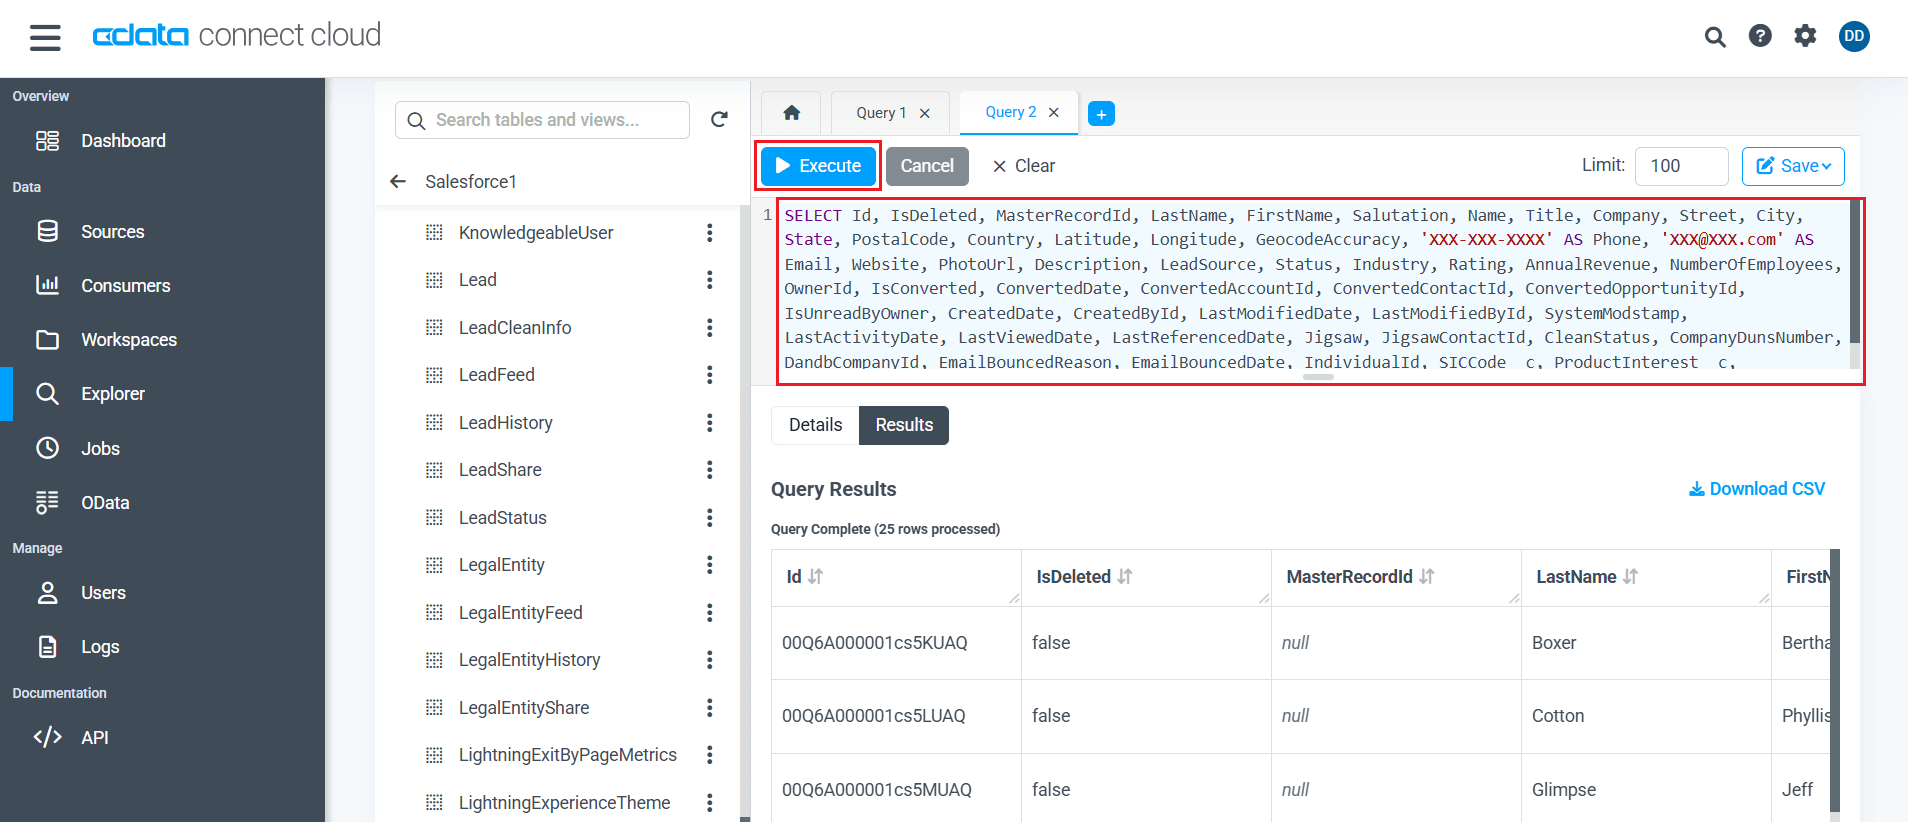
- Copy and paste the AI-generated SQL query in the query builder and click Execute to run the query. You should see the masked data is fetched in real time from Salesforce.
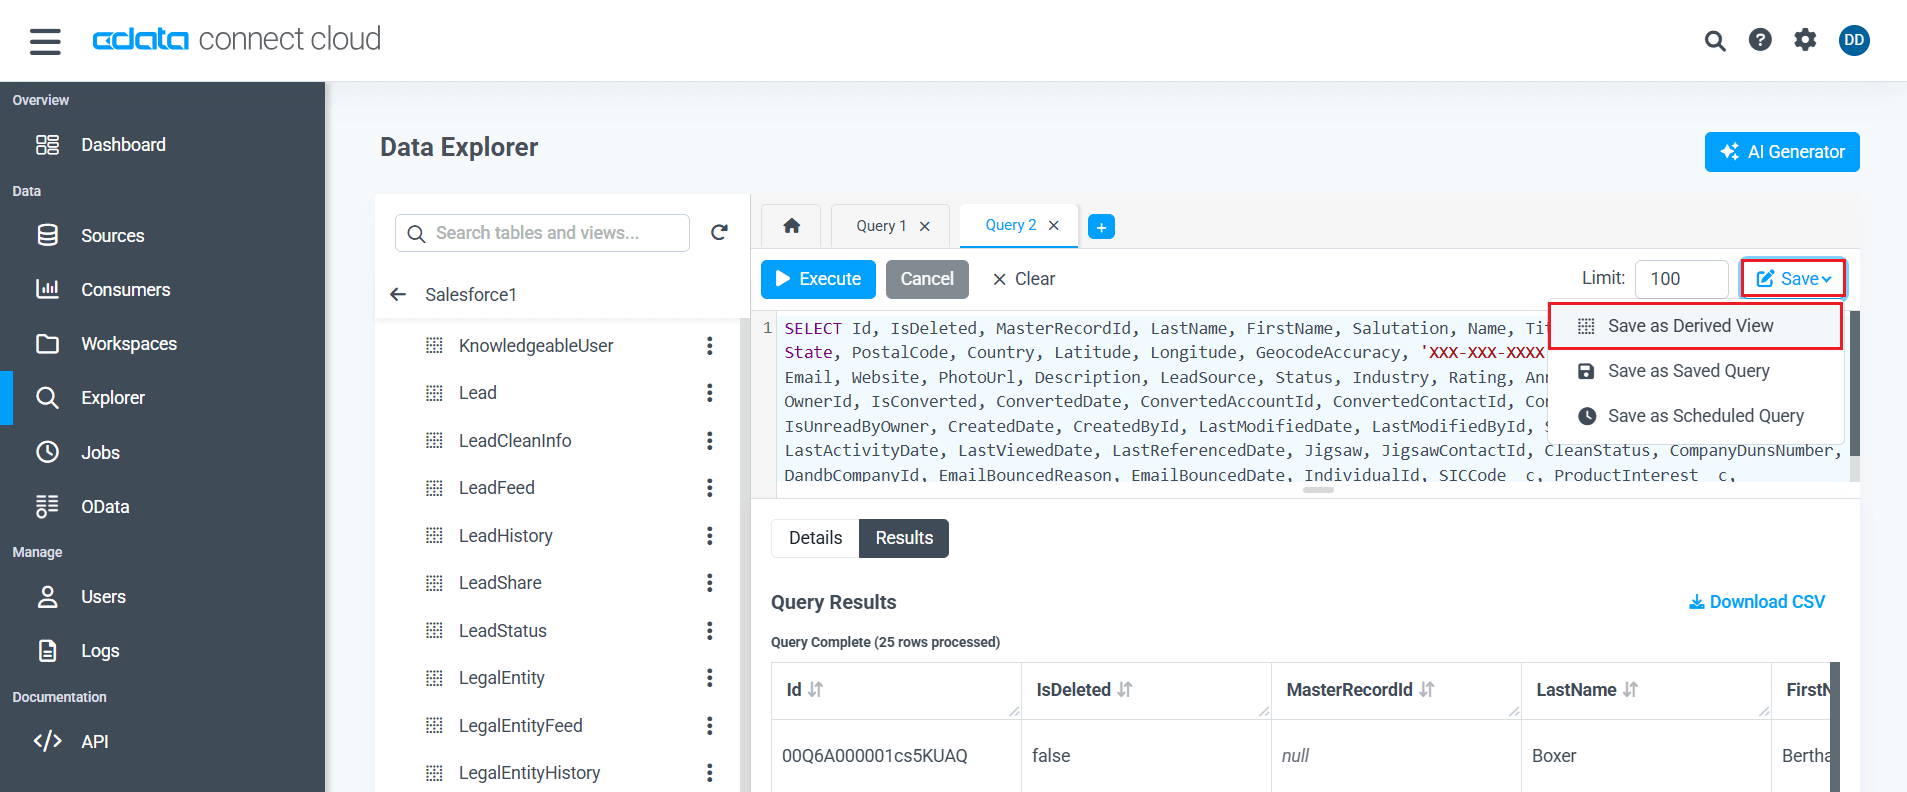
- Next, to save this custom query as a view, click on Save at the top right, then click Save as Derived View, and enter a "View Name."
Configure a Virtual Data Catalog using Virtual Datasets
Follow these steps to create a virtual data catalog using Virtual Datasets in Connect Cloud and assign the necessary User permissions for restricted access.
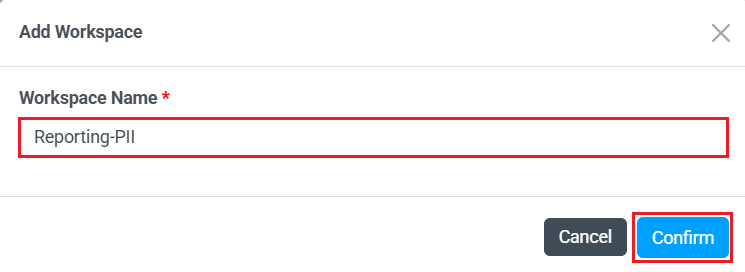
- Go to Workspaces and click Add to add a new workspace. This Workspace will act as a virtual data catalog.

- Add a desired "Workspace Name" in the Add Workspace dialog.
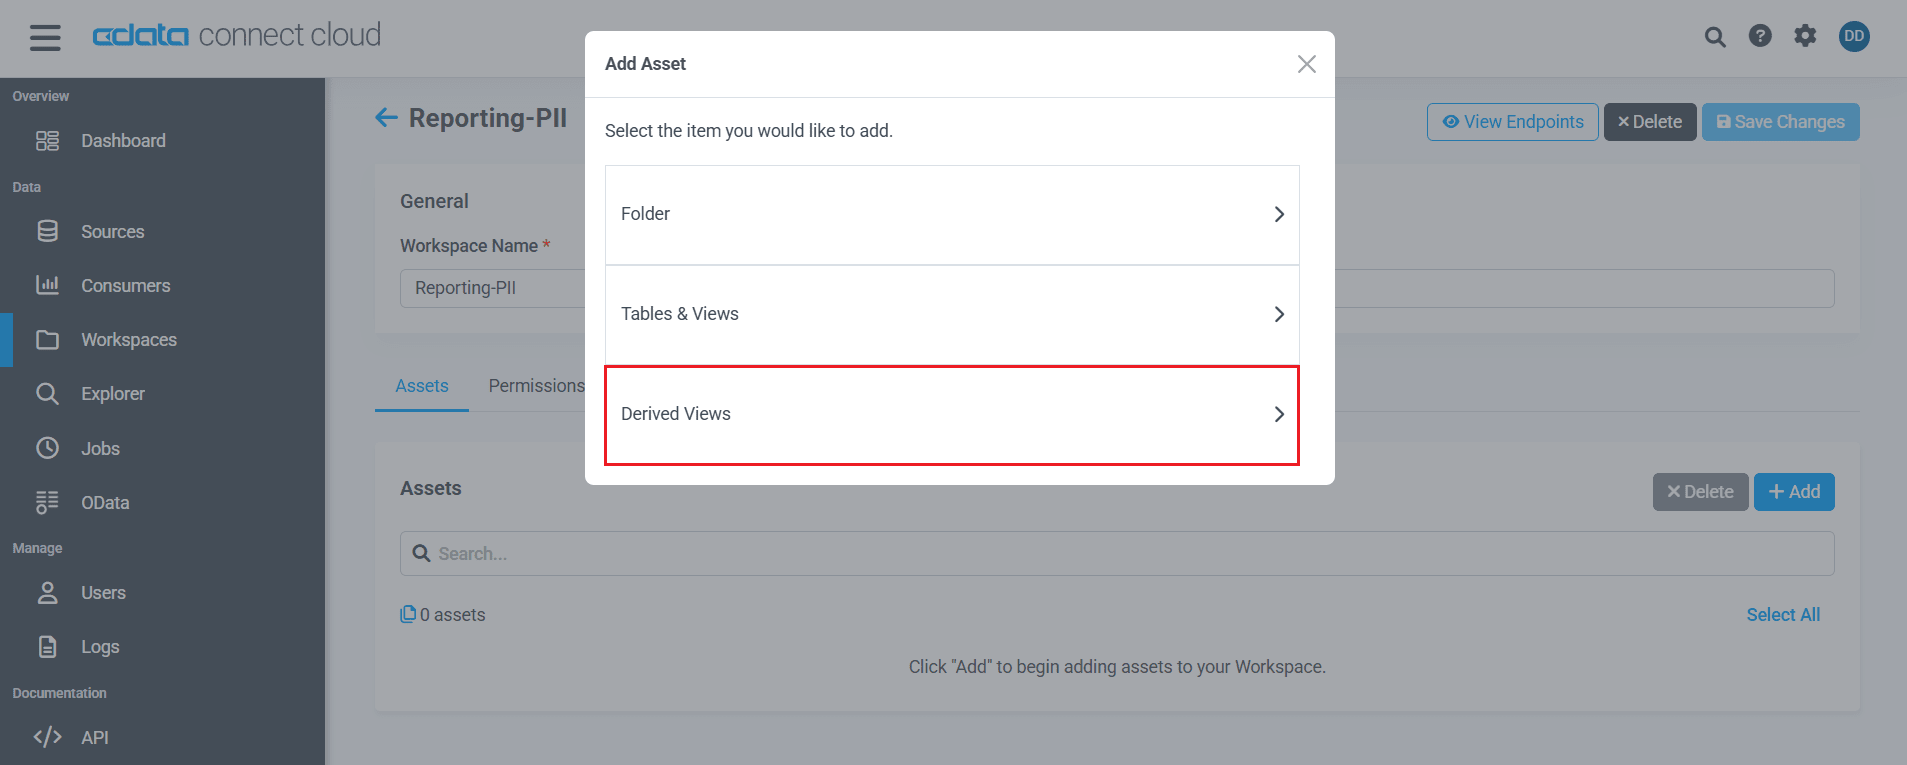
- Navigate to your Workspace and click Add to add Assets to your workspace.
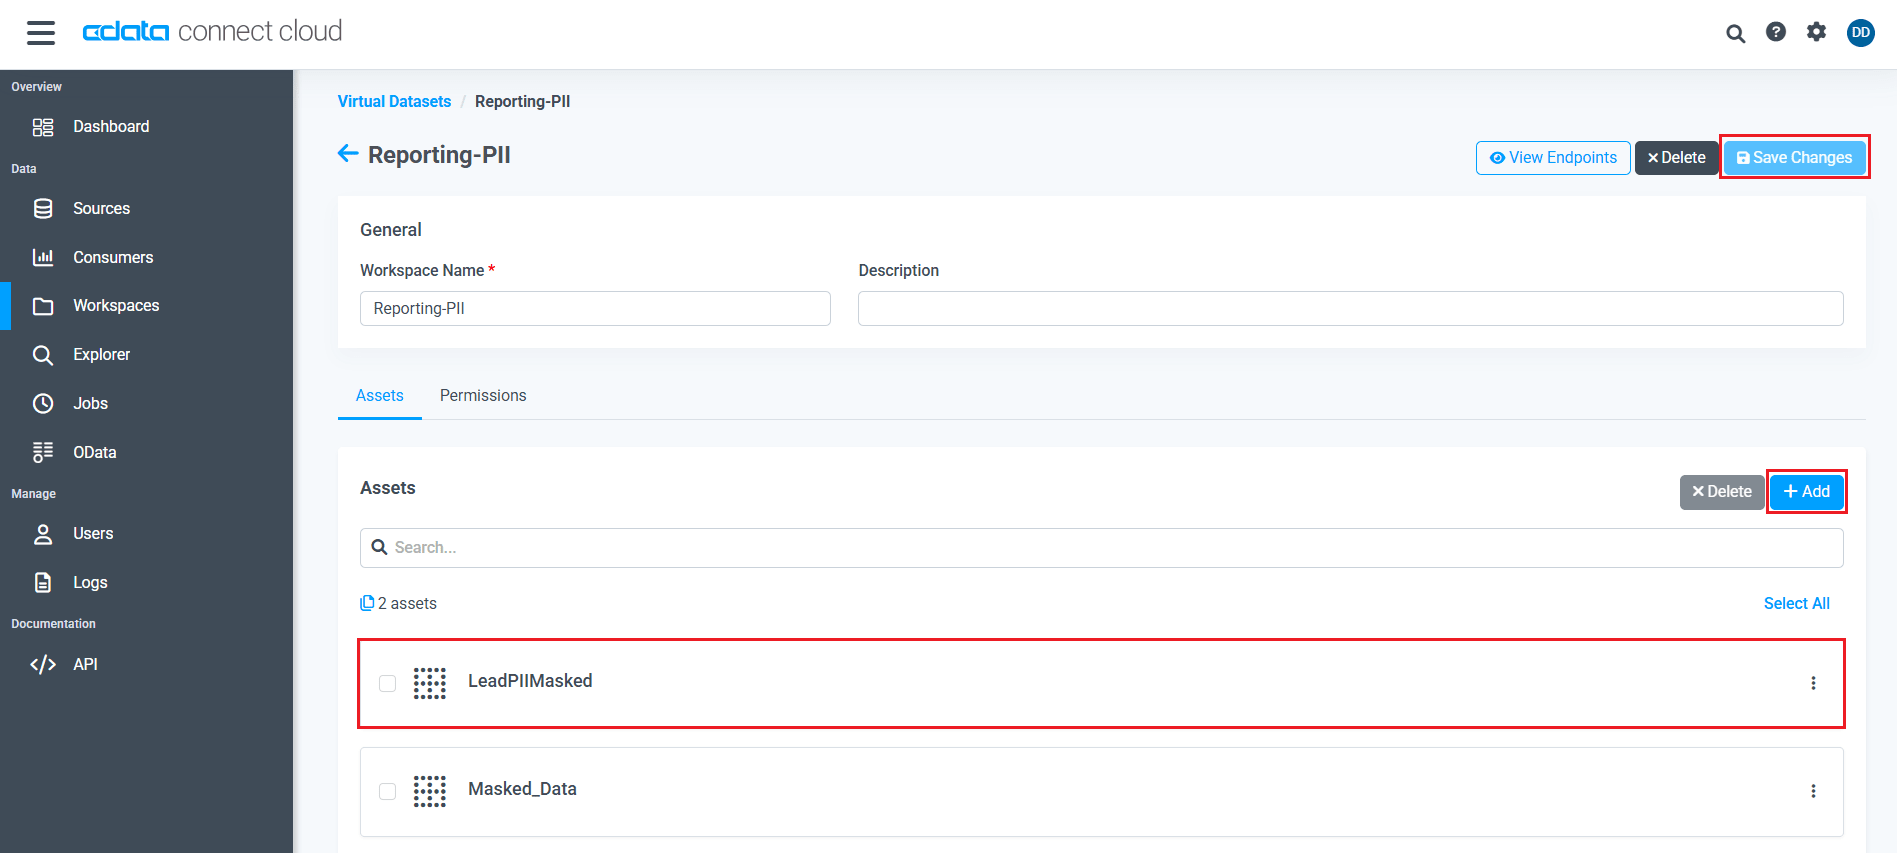
- Select Derived Views, and then select the derived view you created in the previous section.

- You can also add multiple Assets or tables in a workspace (from one or more connections) and retrieve them using a single connection in Power BI.
Add a Query User to CData Connect Cloud
Now, we add a Query User to CData Connect Cloud, which then fetches the PII-obfuscated data from Salesforce in Power BI.
- Navigate to the Users tab and click on Invite Users.
- Add the Email of your Query User and select Role as "Query" from the dropdown.
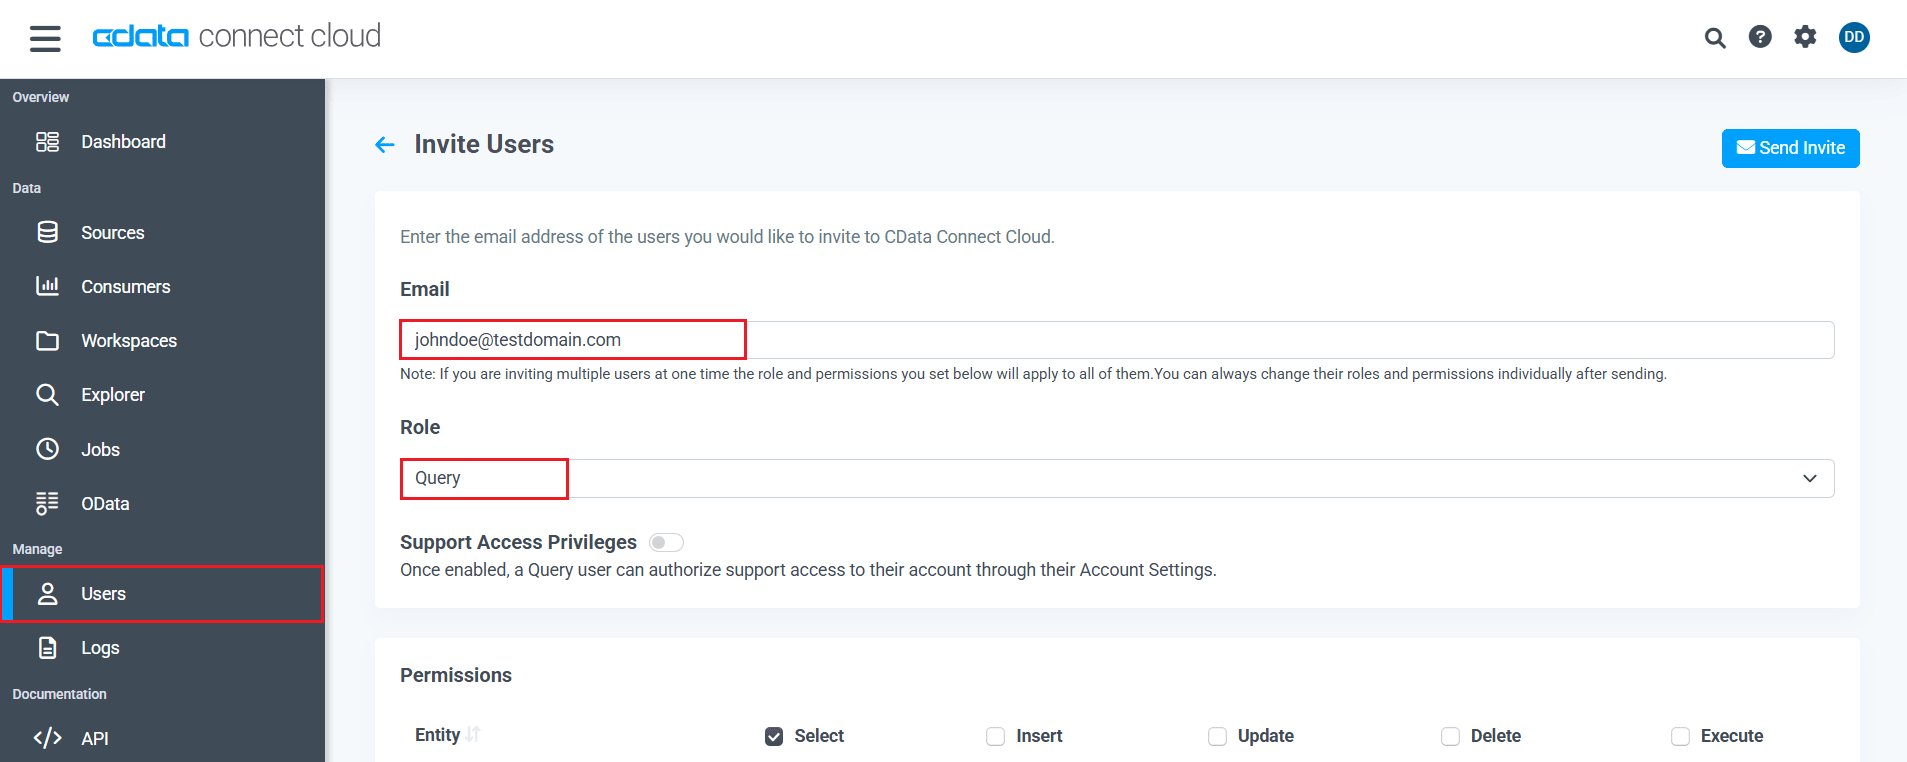
- Additionally, deselect all the Entities to restrict the Permissions for this user. In the next steps, we grant this Query User restricted access to specific entities for reporting.
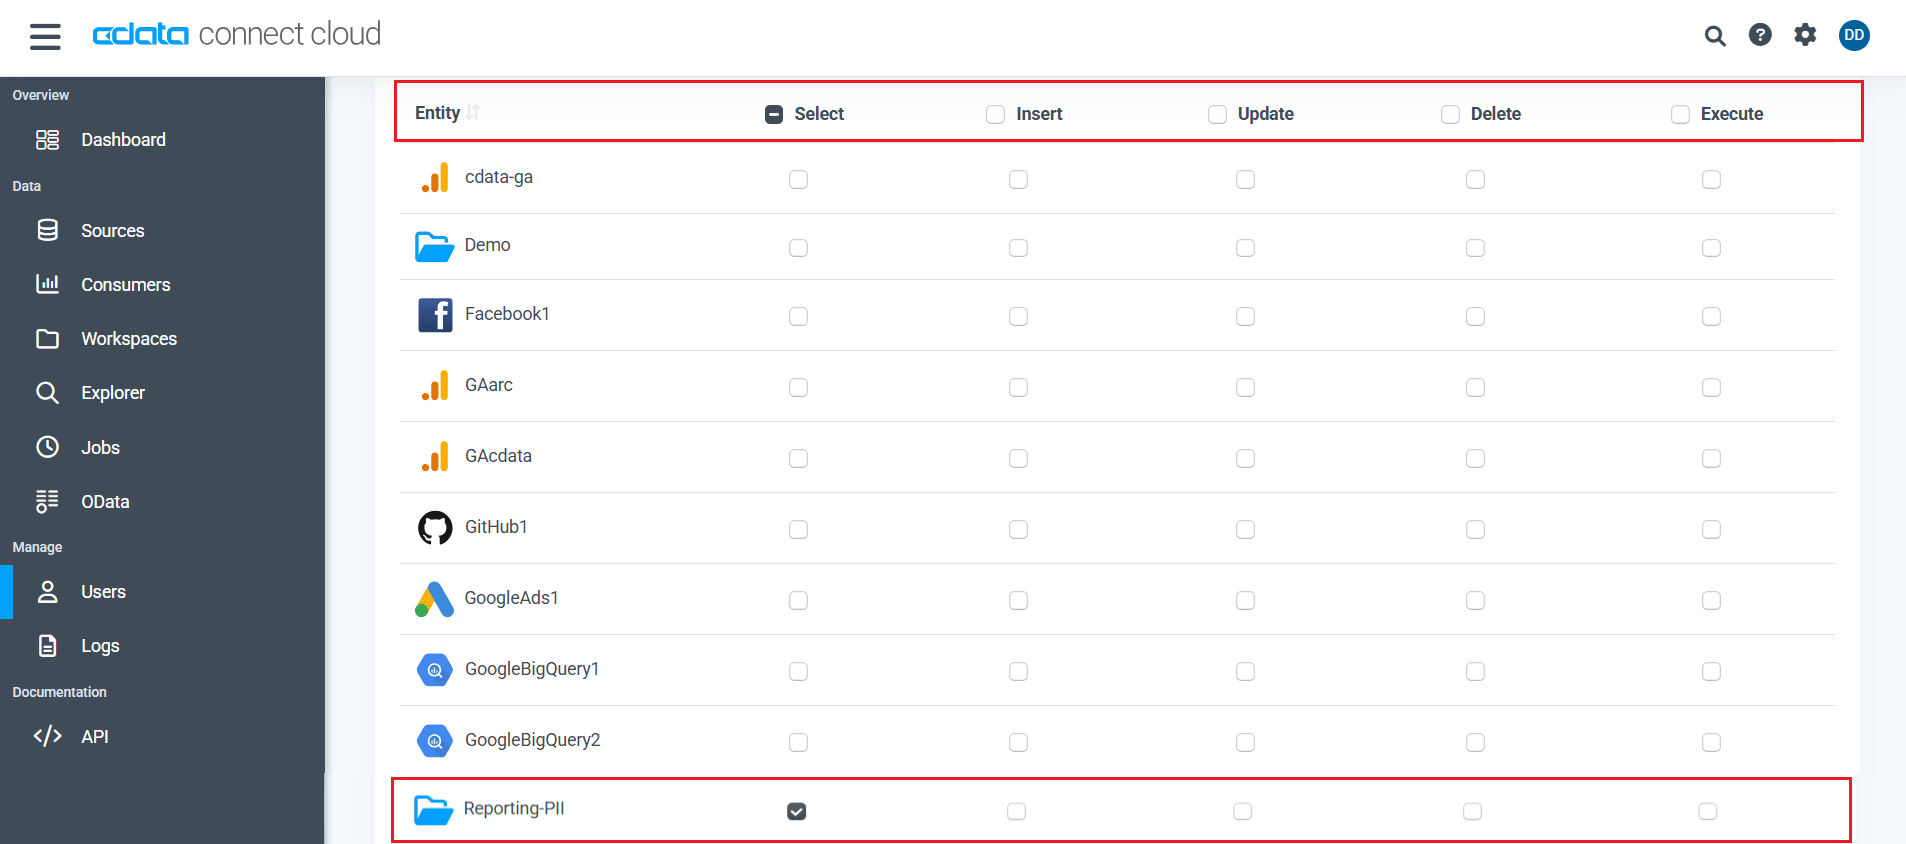
Query Salesforce PII data in Power BI Desktop
Follow the steps below to query the Virtual Datasets created in the previous section and retrieve the PII-obfuscated data in Power BI Desktop:
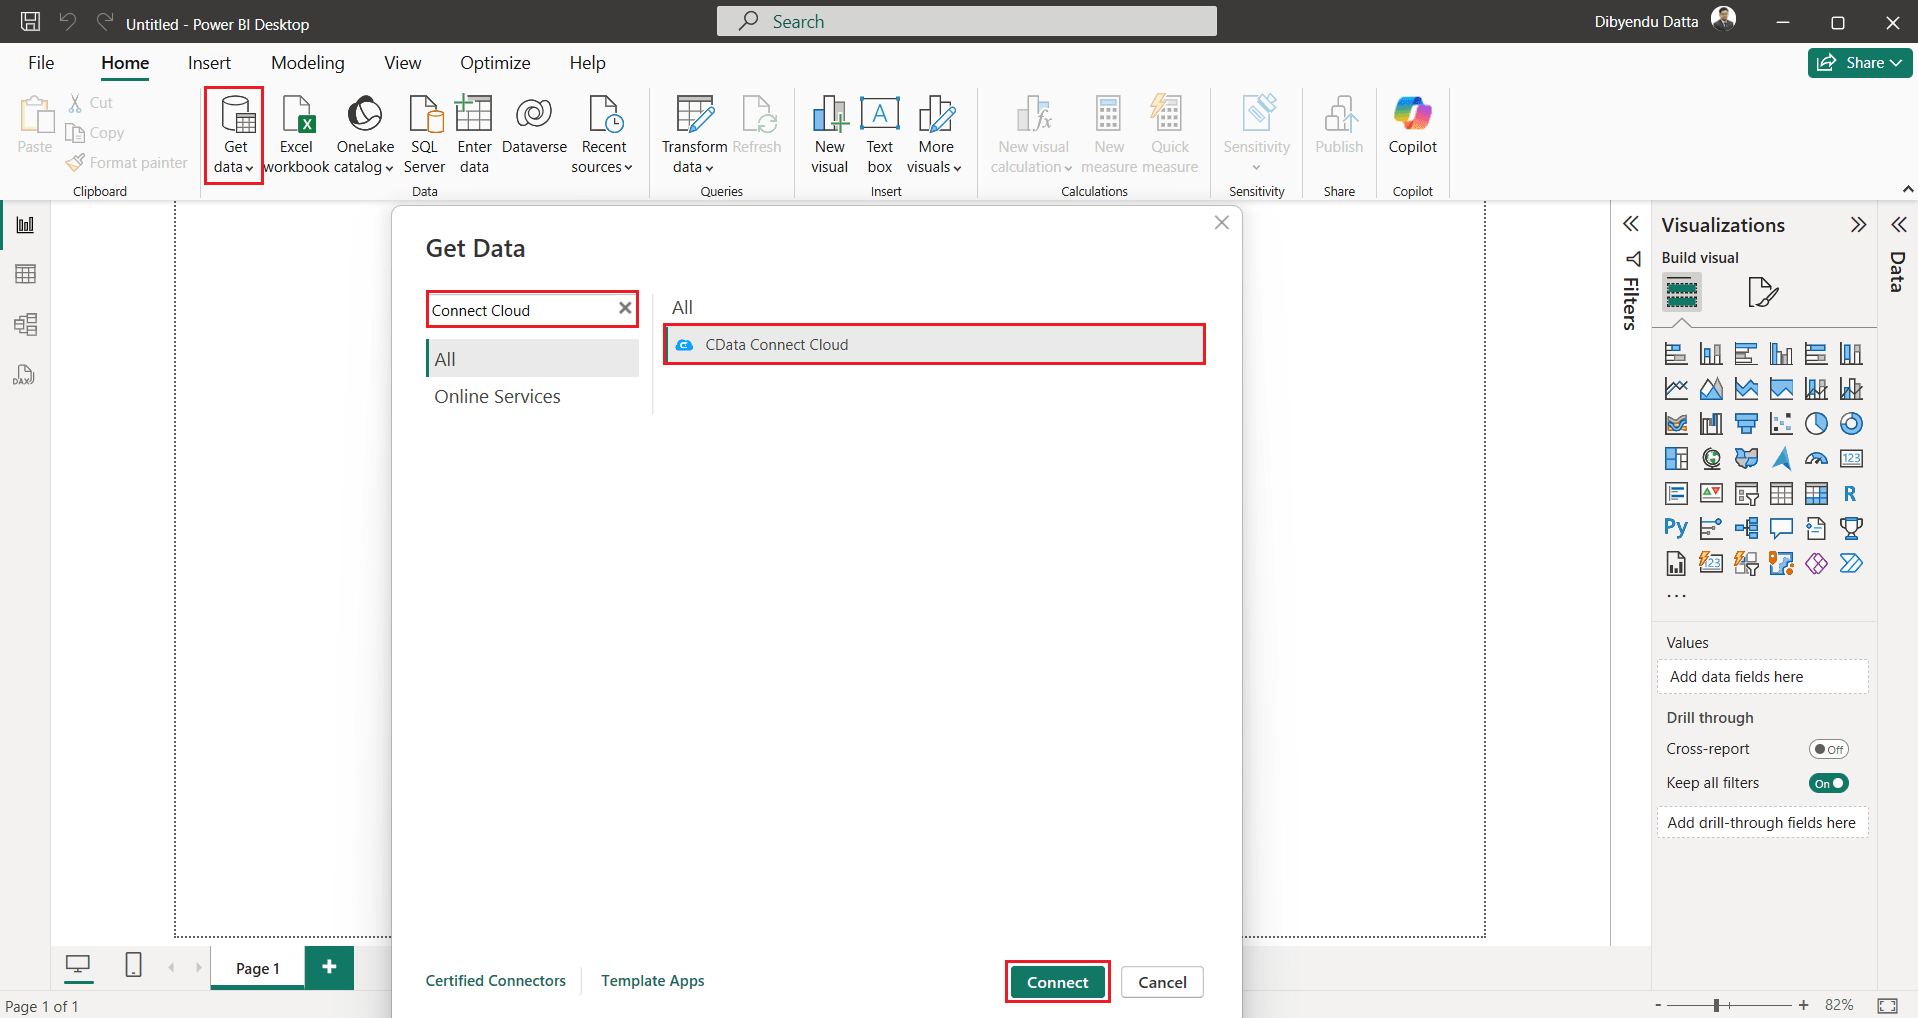
- Open Power BI Desktop. Navigate to Get Data > Online Services > CData Connect Cloud and click Connect.
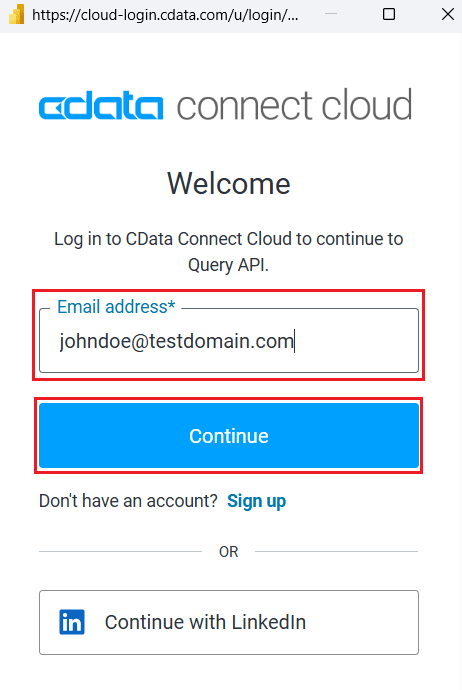
- Click Sign in and authenticate with your CData Connect Cloud account using your Query User credentials.
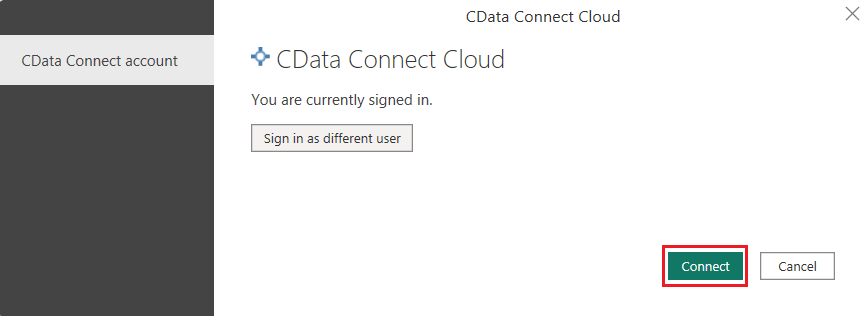
- After signing in, click Connect.
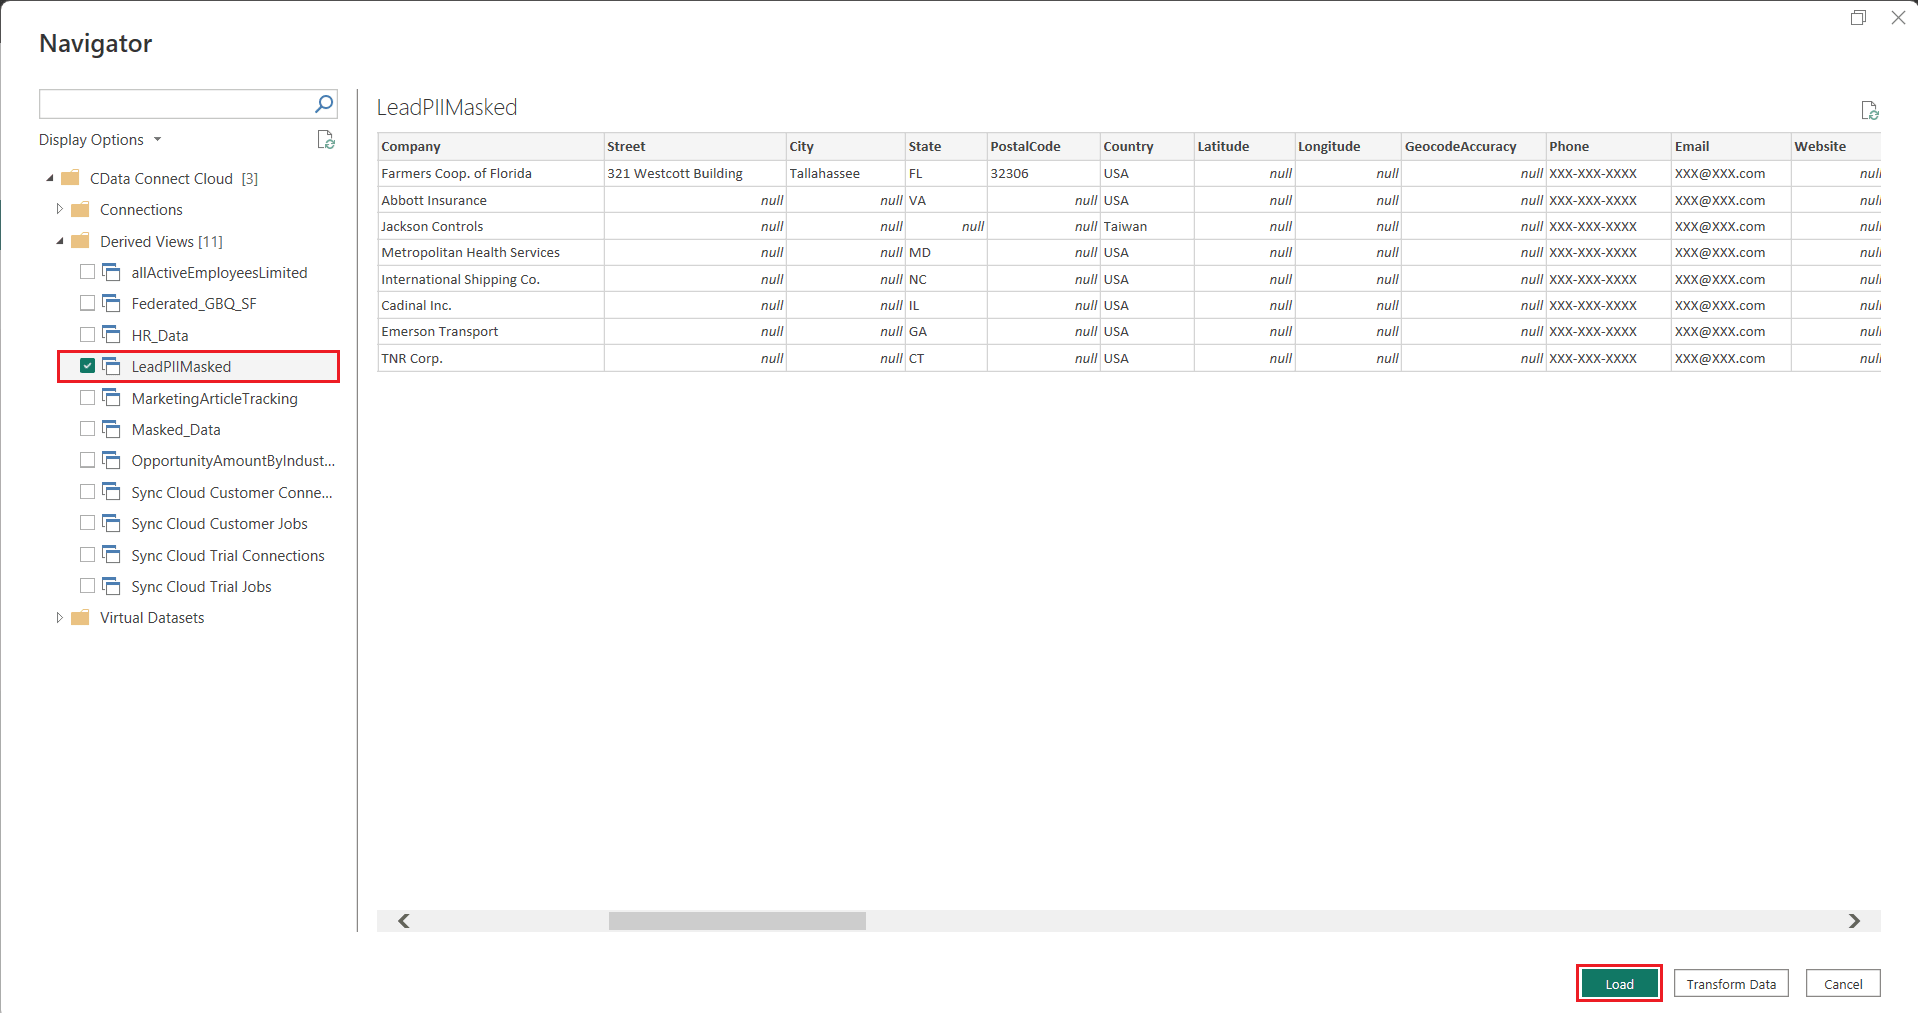
- Select the required table from the list of Derived Views in the Navigator dialog. Click Load to load the PII Obfuscated data into Power BI.
Live Access to Salesforce Data from Data Applications
CData Connect Cloud provides a comprehensive solution for PII obfuscation, enabling organizations to secure their data effectively while ensuring compliance and preserving data utility. By leveraging its advanced capabilities, businesses can reduce the risks of PII exposure and strengthen trust with their customers and stakeholders.
To get live SQL data access to 150+ SaaS, Big Data, and NoSQL sources (including Salesforce) directly from your on-premise BI, reporting, ETL, and other data applications, sign up for a 30-day free trial of CData Connect Cloud today!
As always, let us know if you have any questions during your evaluation. Our world-class CData Support Team is always available to help!

