Model Context Protocol (MCP) finally gives AI models a way to access the business data needed to make them really useful at work. CData MCP Servers have the depth and performance to make sure AI has access to all of the answers.
Try them now for free →Snowflake Drivers: How to Setup and Use Key-Pair Authentication
This article introduces how to use key-pair authentication when connecting to Snowflake with CData Snowflake Drivers.
Snowflake has announced that it will block single-factor authentication sign-ins using passwords by November 2025. For new Snowflake accounts created after October 2024, multi-factor authentication (MFA) will be mandatory when signing in with a password. Additionally, from November 2025, password authentication will be blocked for all users.
When password authentication is blocked, connections using password authentication specified as the authentication method (setting the "Auth Scheme" property to "Password") in CData Snowflake Drivers will no longer be possible. Therefore, users currently using password authentication need to switch to the key-pair authentication method introduced in this article (or OAuth authentication; learn more).
CData Snowflake Drivers support various authentication methods with Snowflake. Key-pair authentication is an authentication method using RSA key pairs. To connect using key-pair authentication from CData solutions, you need to have the private key of the key pair available and the public key must be assigned to the login user. This article explains how to configure key-pair authentication with Snowflake and use key-pair authentication from CData Drivers for Snowflake.
Creating a Key-Pair and Assigning the Public Key
The detailed instructions for setting up Snowflake key pair authentication are provided in this Snowflake manual page. First, generate the key pairs. As described in the manual page, use OpenSSL to generate the private key and public key.
Generating a Private Key (Unencrypted)
Open a terminal and run the following command:
openssl genrsa 2048 | openssl pkcs8 -topk8 -inform PEM -out rsa_key.p8 -nocrypt
Generating a Private Key (Encrypted)
Open a terminal and run the following command, which does not include the -nocrypt parameter:
openssl genrsa 2048 | openssl pkcs8 -topk8 -v2 des3 -inform PEM -out rsa_key.p8
Once the commands complete, they generate a private key in PEM format.
-----BEGIN ENCRYPTED PRIVATE KEY-----
    MIIE6T...
-----END ENCRYPTED PRIVATE KEY-----
Generating a Public Key
In the terminal, generate the public key by referencing the private key.
openssl rsa -in rsa_key.p8 -pubout -out rsa_key.pub
Where ras_key.p8 is the file containing an encrypted private key and rsa_key.pub is the desired filename for the public key. If you open or inspect the public key, you will see the key in PEM format.
-----BEGIN PUBLIC KEY-----
    MIIBIj...
-----END PUBLIC KEY-----
Assign the public key to a Snowflake user
Next, assign the public key to the Snowflake user. As described in the manual page, execute the ALTER USER command with user with the SECURITYADMIN role or higher..
ALTER USER my_user SET RSA_PUBLIC_KEY='MIIBIj...';
Now you are ready to authenticate to Snowflake with key-pair authentication.
How to Connect Using Key-Pair Authentication in CData Snowflake Drivers
To use key pair authentication with the driver, set the "AuthScheme" property to "PrivateKey" and configure the necessary authentication information. Below are the properties required for key-pair authentication:
| Connection Property | Details or recommended value |
|---|---|
| URL | Your Snowflake account URL |
| Warehouse | The target warehouse |
| User | The username of the authenticating user |
| AuthScheme | PrivateKey |
| PrivateKeyType | Format of the private key (in this example, PEMKEY_FILE) |
| PrivateKey | The value of key, based on the format in PrivateKeyType (in this example, the full path and name of the private key file, /PATH/TO/rsa_key.p8 ) |
| PrivateKeyPassword | The password of the private key, if any |
Sample Connections CData Snowflake Products
Use the connection instructions above to configure the connection appropriately in your CData solution.
CData JDBC Driver for Snowflake
With the JDBC Driver, simply use the connection properties in the JDBC URL.
jdbc:cdata:snowflake:url=https://xxxxxx.us-east-1.snowflakecomputing.com; Warehouse=TEST_WAREHOUSE; User=TESTUSER;AuthScheme=PrivateKey; PrivateKey="C:\SnowflakePrivateKey\rsa_key.p8"; PrivateKeyType=PEMKEY_FILE; PrivateKeyPassword="*****";
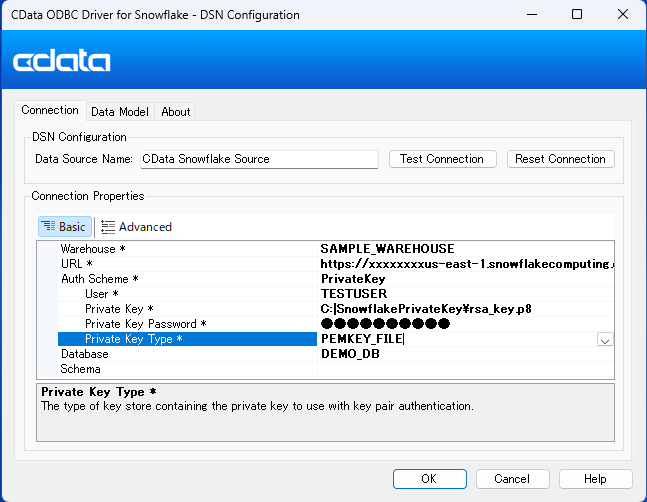
CData ODBC Driver for Snowflake
With the ODBC Driver, you will set the connection properties in the DSN configuration wizard.

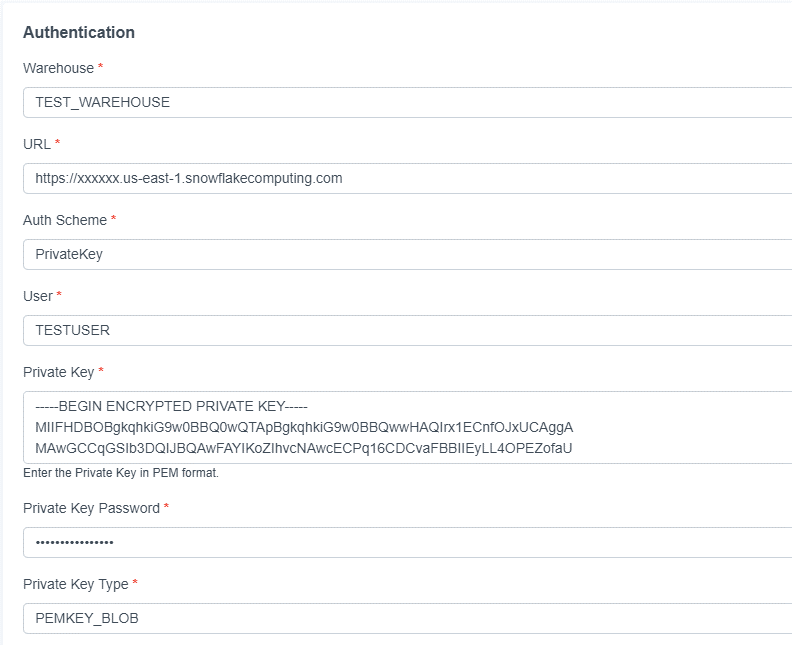
CData Connect Cloud
As a SaaS application, CData Connect Cloud does not have access to your file system. You will use the contents of the private key by setting PrivateKeyType to "PEMKEY_BLOB" and copying the contents into PrivateKey.

Now you are ready perform key-pair authentication with CData Snowflake Drivers. CData Snowflake Drivers are available for a 30-day free trial, so if you are considering integrating with Snowflake, please give it a try.
Snowflake Drivers also support OAuth authentication. For connecting via OAuth authentication, please refer to our other article (Snowflake Drivers: How to Setup and Use OAuth Authentication ).

