Model Context Protocol (MCP) finally gives AI models a way to access the business data needed to make them really useful at work. CData MCP Servers have the depth and performance to make sure AI has access to all of the answers.
Try them now for free →Use the API Server and SAP ADO.NET Provider in Microsoft Power BI
You can use the API Server to feed SAP data to Power BI dashboards. Simply drag and drop SAP data into data visuals on the Power BI canvas.
The CData API Server enables your organization to create Power BI reports based on the current SAP data (plus data from 200+ other ADO.NET Providers). The API Server is a lightweight Web application that runs on your server and, when paired with the ADO.NET Provider for SAP, provides secure OData services of SAP data to authorized users. The OData standard enables real-time access to the live data, and support for OData is integrated into Power BI. This article details how to create data visualizations based on SAP OData services in Power BI.
About SAP Data Integration
CData provides the easiest way to access and integrate live data from SAP. Customers use CData connectivity to:
- Access every edition of SAP, including SAP R/3, SAP NetWeaver, SAP ERP / ECC 6.0, and SAP S/4 HANA on premises data that is exposed by the RFC.
- Perform actions like sending IDoc or IDoc XML files to the server and creating schemas for functions or queries through SQL stored procedures.
-
Connect optimally depending on where a customer's SAP instance is hosted.
- Customers using SAP S/4HANA cloud public edition will use SAP NetWeaver Gateway connectivity
- Customers using SAP S/4HANA private edition will use either SAP ERP or SAP NetWeaver Gateway connectivity.
While most users leverage our tools to replicate SAP data to databases or data warehouses, many also integrate live SAP data with analytics tools such as Tableau, Power BI, and Excel.
Getting Started
Set Up the API Server
Follow the steps below to begin producing secure SAP OData services:
Deploy
The API Server runs on your own server. On Windows, you can deploy using the stand-alone server or IIS. On a Java servlet container, drop in the API Server WAR file. See the help documentation for more information and how-tos.
The API Server is also easy to deploy on Microsoft Azure, Amazon EC2, and Heroku.
Connect to SAP
After you deploy the API Server and the ADO.NET Provider for SAP, provide authentication values and other connection properties needed to connect to SAP by clicking Settings -> Connection and adding a new connection in the API Server administration console.
The Java edition supports connecting to an SAP system using the JCo .jar file. See the "Getting Started" chapter in the help documentation for information on using the Jco JAR file.
The Windows edition supports connecting to SAP systems using either the librfc32.dll, the librfc32u.dll, NetWeaver, or Web Services (SOAP). Set the ConnectionType connection property to CLASSIC (librfc32.dll), CLASSIC_UNICODE (librfc32u.dll), NETWEAVER, or SOAP.
Note: We do not distribute the librfc32.dll or other SAP assemblies. You must find them from your SAP installation and install them on your machine.
All versions of Sync support connecting to an SAP system using Web services (SOAP). If you are using the SOAP interface you must enable SOAP access to your SAP system and set the Client, RFCUrl, SystemNumber, User, and Password properties, under the Authentication section. Additionally, set the ConnectionType to SOAP.
See this guide on obtaining the connection properties needed to connect to any SAP system.
When you configure the connection, you may also want to set the Max Rows connection property. This will limit the number of rows returned, which is especially helpful for improving performance when designing reports and visualizations.
You can then choose the SAP entities you want to allow the API Server access to by clicking Settings -> Resources.
Authorize API Server Users
After determining the OData services you want to produce, authorize users by clicking Settings -> Users. The API Server uses authtoken-based authentication and supports the major authentication schemes. Access can also be restricted based on IP address; by default, only connections to the local machine are allowed. You can authenticate as well as encrypt connections with SSL.
Connect to SAP
Follow the steps below to connect to SAP data from Power BI.
- Open Power BI Desktop and click Get Data -> OData Feed. To start Power BI Desktop from PowerBI.com, click the download button and then click Power BI Desktop.
-
Enter the URL to the OData endpoint of the API Server. For example:
http://MyServer:8032/api.rsc -
Enter authentication for the API Server. To configure Basic authentication, select Basic and enter the username and authtoken for a user of the OData API of the API Server.
The API Server also supports Windows authentication using ASP.NET. See the help documentation for more information.
-
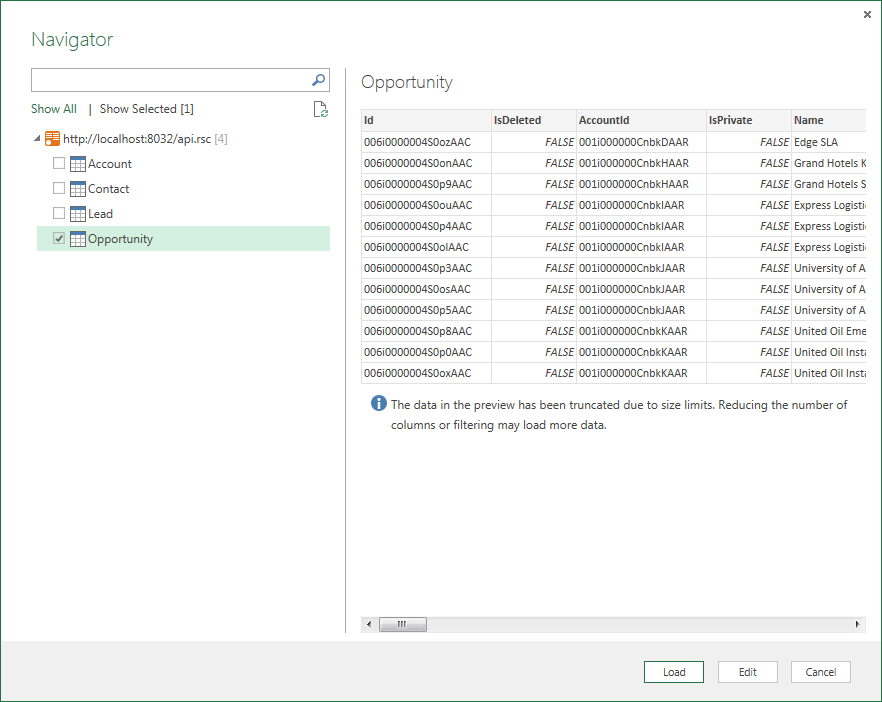
In the Navigator, select tables to load. For example, MARA.

Create Data Visualizations
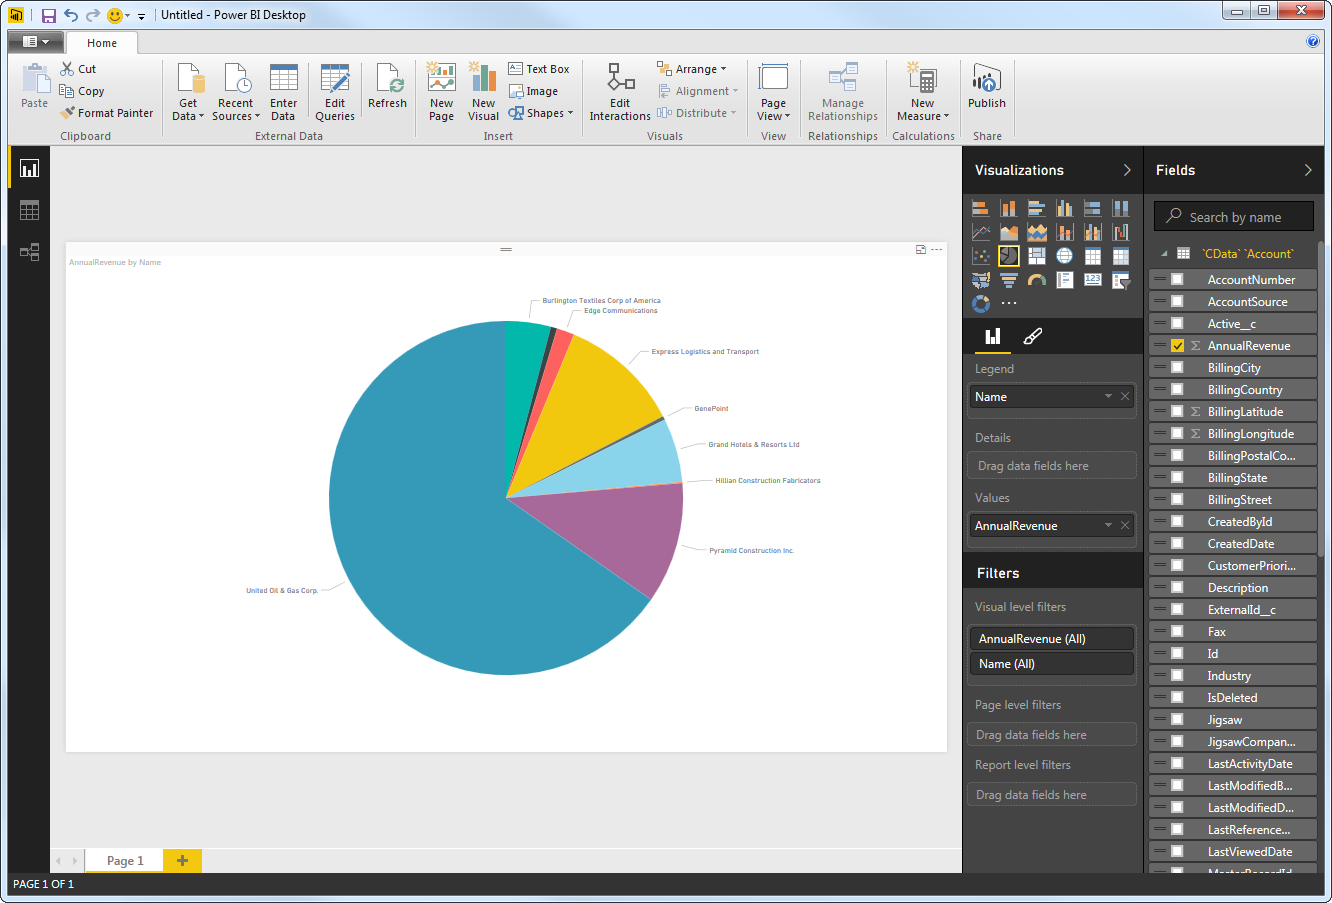
After pulling the data into Power BI, you can create data visualizations in the Report view. Follow the steps below to create a pie chart:
- Select the pie chart icon in the Visualizations pane.
- Select a dimension in the Fields pane: for example, MANDT.
- Select a measure in the MBRSH in the Fields pane: for example, MBRSH.

You can change sort options by clicking the ellipsis (...) button for the chart. Options to select the sort column and change the sort order are displayed.
You can use both highlighting and filtering to focus on data. Filtering removes unfocused data from visualizations; highlighting dims unfocused data.
You can highlight fields by clicking them:

You can apply filters at the page level, at the report level, or to a single visualization by dragging fields onto the Filters pane. To filter on the field's value, select one of the values that are displayed in the Filters pane.

Click Refresh to synchronize your report with any changes to the data.
Upload SAP Data Reports to Power BI
You can now upload and share reports with other Power BI users in your organization. To upload a dashboard or report, log into PowerBI.com, click Get Data in the main menu and then click Files. Navigate to a Power BI Desktop file or Excel workbook. You can then select the report in the Reports section.
Refresh on Schedule and on Demand
You can configure Power BI to automatically refresh your uploaded report. You can also refresh the dataset on demand in Power BI. Follow the steps below to schedule refreshes through the API Server:
- Log into Power BI.
- In the Dataset section, right-click the SAP Dataset and click Schedule Refresh.
- If you are hosting the API Server on a public-facing server like Azure, you can connect directly. Otherwise, if you are connecting to a feed on your machine, you will need to expand the Gateway Connection node and select a gateway, for example, the Microsoft Power BI Personal Gateway.
- In the settings for your dataset, expand the Data Source Credentials node and click Edit Credentials.
- Expand the Schedule Refresh section, select Yes in the Keep Your Data Up to Date menu, and specify the refresh interval.
You can now share real-time SAP reports through Power BI.
