Model Context Protocol (MCP) finally gives AI models a way to access the business data needed to make them really useful at work. CData MCP Servers have the depth and performance to make sure AI has access to all of the answers.
Try them now for free →Consume Zendesk OData Feeds in PowerBuilder
This article demonstrates how to consume Zendesk data as OData feeds from PowerBuilder using the API Server.
The CData API Server, when paired with the ADO.NET Provider for Zendesk (or any of 200+ other ADO.NET Providers), produces secure feeds of Zendesk data that you can consume in PowerBuilder DataWindows. The API Server supports the major Web services, including OData, Atom, JSON, HTML, CSV, TSV, and RSS. It also supports the major authentication schemes and SSL.
This article shows how to create a DataWindow that uses the CData API Server to execute reads and writes.
Set Up the API Server
Follow the steps below to begin producing secure Zendesk OData services:
Deploy
The API Server runs on your own server. On Windows, you can deploy using the stand-alone server or IIS. On a Java servlet container, drop in the API Server WAR file. See the help documentation for more information and how-tos.
The API Server is also easy to deploy on Microsoft Azure, Amazon EC2, and Heroku.
Connect to Zendesk
After you deploy the API Server and the ADO.NET Provider for Zendesk, provide authentication values and other connection properties needed to connect to Zendesk by clicking Settings -> Connections and adding a new connection in the API Server administration console.
Connecting to Zendesk
To connect, set the URL and provide authentication. The URL is your Zendesk Support URL: https://{subdomain}.zendesk.com.
Authenticating to Zendesk
You can authenticate using the Basic or OAuth methods.
Using Basic Authentication
To use Basic authentication, specify your email address and password or your email address and an API token. Set User to your email address and follow the steps below to provide the Password or ApiToken.
- Enable password access in the Zendesk Support admin interface at Admin > Channels > API.
- Manage API tokens in the Zendesk Support Admin interface at Admin > Channels > API. More than one token can be active at the same time. Deleting a token deactivates it permanently.
Using OAuth Authentication
See the Getting Started guide in the CData driver documentation for an authentication guide.
You can then choose the Zendesk entities you want to allow the API Server access to by clicking Settings -> Resources.
Additionally, click Settings -> Server and change the following settings for compatibility with PowerBuilder:
- Default Format: Select XML (Atom) in the menu.
- Default Version: Select 2.0 in the menu.
Authorize API Server Users
After determining the OData services you want to produce, authorize users by clicking Settings -> Users. The API Server uses authtoken-based authentication and supports the major authentication schemes. Access can also be restricted based on IP address; by default, only connections to the local machine are allowed. You can authenticate as well as encrypt connections with SSL.
Create a Profile for Zendesk
Follow the steps below to use the Database Painter tool to create a database profile for the OData API of the API Server. In the Database Painter, you can graphically manipulate data as well as execute SQL queries.
- Click Tools -> Database Painter.
- Right-click the OData node and click New Profile.
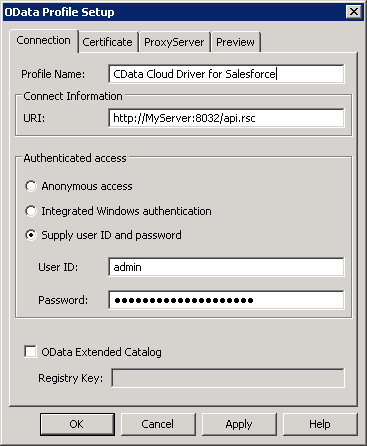
- In the Database Profile Setup dialog, enter the following:
- Profile Name: Enter a user-friendly name for the profile.
- URI: Enter the URL to the OData endpoint of the API Server. This URL will resemble the one below:
http://MyServer:8032/api.rsc - Supply User Id and Password: Click this option to use HTTP Basic authentication. Note that the API Server also supports Windows authentication.
- User Id: Enter the name of an user in the API Server.
- Password: Enter the authtoken of an user in the API Server.

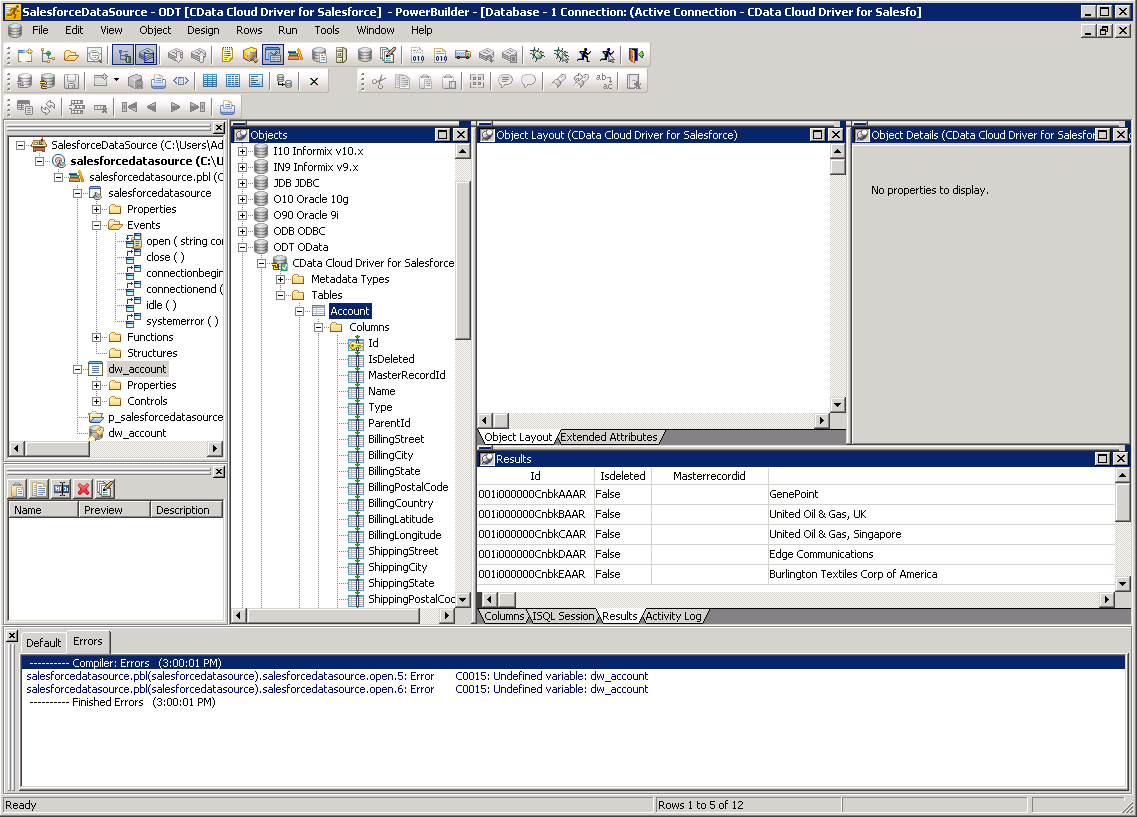
- To view and modify a table, right-click a table and then click Edit Data -> Grid.

Using Zendesk Data with PowerBuilder Controls
You can use standard PowerBuilder objects to connect to OData feeds and execute queries. The following example shows how to retrieve Zendesk data into a DataWindow.
You can add the following code to the open method:
SQLCA.DBMS = "ODT"
SQLCA.DBParm = "ConnectString='URI=http://MyServer:8032/api.rsc;UID=MyAPIUser;PWD=MyAuthtoken'";
CONNECT USING SQLCA;
dw_tickets.SetTransObject(SQLCA);
dw_tickets.Retrieve();
